This article explores the server and database audit in AWS RDS SQL Server.
Introduction
Data security is a critical task for any organization. We should only provide data access to authorized persons. Our main aim is to protect any data while in rest or data in transit. Let’s take the example of a credit card company. It stores the customer’s credit card information in database tables. We should protect the data in the following ways:
- Infrastructure security such as firewall, data center, hardware security, network security
- Prevent access to customer information for unauthorized persons
- Data encryption
- Data masking
- Data resilience
- Compliance with data security standards such as GDPR, SOX, PCI
- Payment, mobile app, website security
- Always encrypted data
Once we implement the various security solutions, auditing plays a crucial role. We should be able to investigate any suspicious activities using the audit. SQL Server provides several audit options. You should go through the following articles for this:
- Understanding the SQL Server Audit
- SQL Server Audit Overview
- SQL Server auditing with Server and Database audit specifications
In the previous articles, we explored various features of AWS RDS SQL Server. In this article, we will explore how we can audit for cloud-based managed RDS instance.
Prerequisite
- Create an RDS SQL Server instance. Use article AWS RDS SQL Server – Launching a new database instance for reference purposes
For this article, I am using the following SQL instance:
RDS SQL version: Microsoft SQL Server 2017 (RTM-CU16) (KB4508218) – 14.0.3223.3 (X64

- Create an Amazon S3 bucket in the same region that host RDS instance. Take reference from AWS RDS SQL Server migration using native backups article
SQL Server Audit in AWS RDS SQL Server
We can use both Server and Database audit specifications in the RDS SQL Server instance. It is a similar audit we create in the on-premise SQL Server as well. We can configure the auditing in all AWS regions except for Asia Pacific (Hong Kong) region as of today:
Audit type | RDS SQL version |
Server audit specification | SQL Server 2012 all editions |
Database audit specification | SQL Server 2012 – Enterprise edition SQL Server 2016 SP1 |
We enable audit in RDS instance using Options groups:
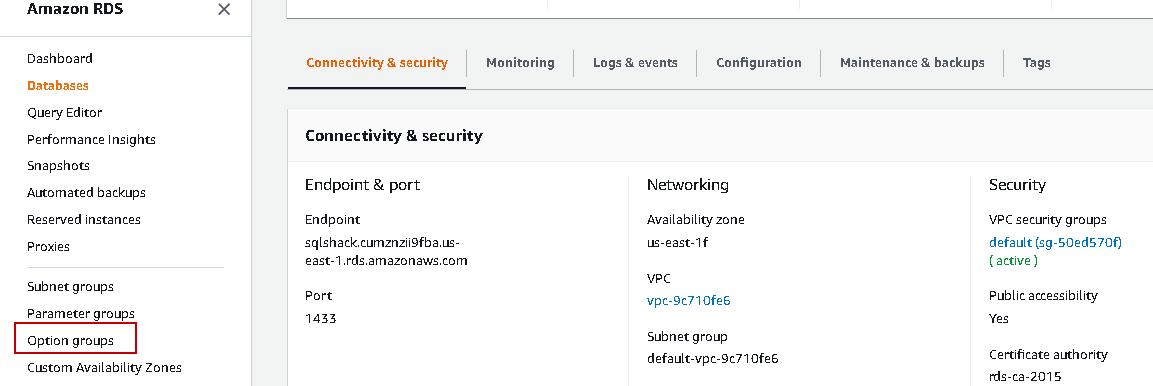
Navigate to Options groups, and it opens the default along with custom options groups:
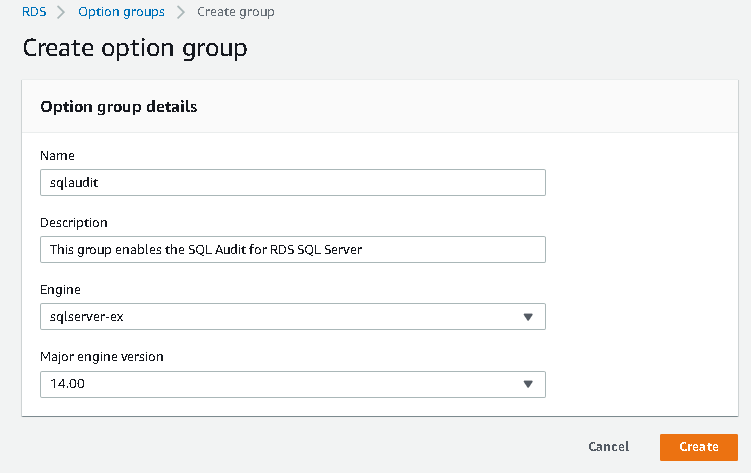
Click on Create group and specify the following inputs:
- Option group name
- Description (optional)
- Engine: Select the SQL Server edition of your RDS instance such as express, standard, enterprise from the drop-down
- Major engine version: Select the SQL Server version. I have SQL 2017 RDS instance, so selecting 14.0 as a major instance
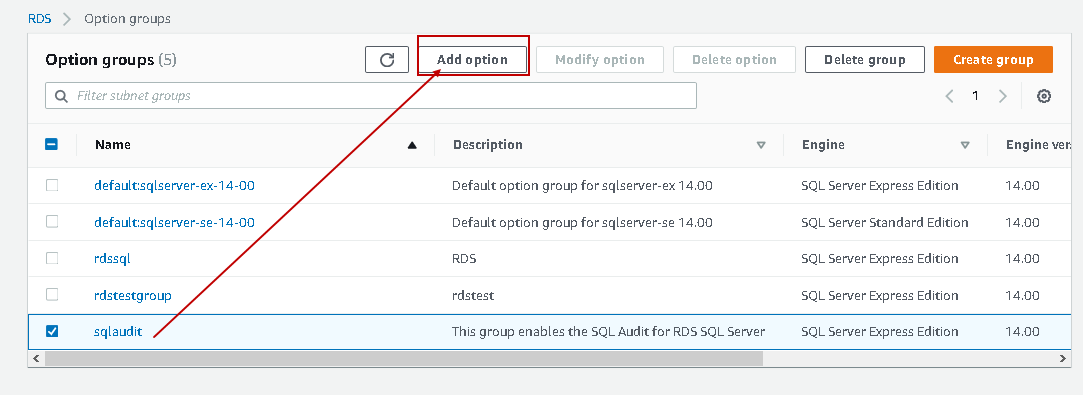
Click on Create and add option as shown below:
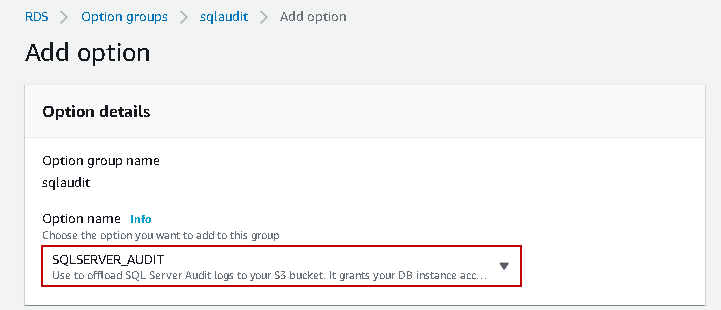
It opens a page for adding audit options in AWS RDS SQL Server. This page contains the following sections.
Option details
This section shows the options group name we specified earlier. From the drop-down list, select the option SQLSERVER_Audit:
S3 destination
RDS uploads the audit log files to the S3 bucket in the same region. It only uploads the completed audit files. We will see this in actions in the further section of the article.
Select the S3 bucket from the drop-down list:

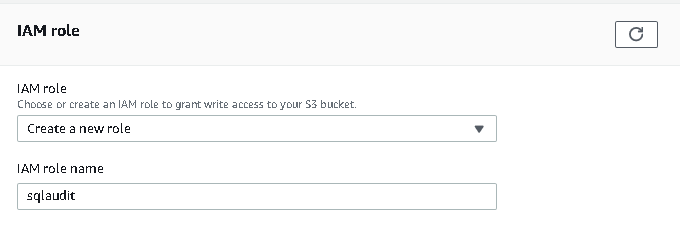
IAM role
We can select an existing IAM role or create a new role. Let’s create a new role and specify the name sqlaudit for it:
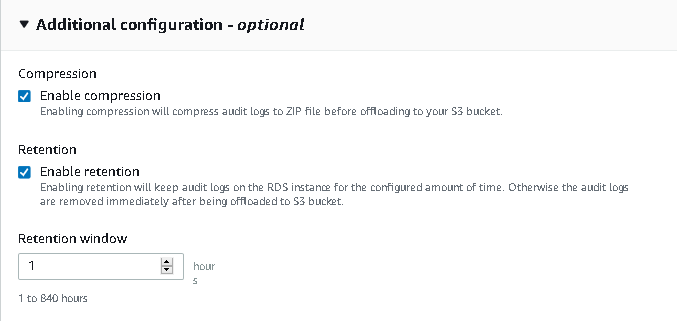
Additional Configuration – Optional
It provides two additional configuration options:
- Enable Compression: RDS SQL Server compresses the audit log file to the ZIP file and places them into the S3 bucket. It saves the storage in the S3 bucket. By default, this option is enabled
- Enable retention: We can enable and specify a retention window (1 to 840 hours). AWS maintains and stores the audit logs for the configured retention period. By default, this option is disabled that shows the AWS removes the audit logs once they are offloaded to the specified S3 bucket
Scheduling
We can select the schedule for adding the option for AWS RDS SQL Server. We can do it immediately (downtime involved) or set it for the next scheduled maintenance window:
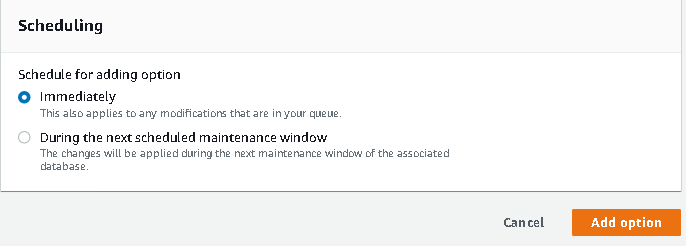
Let’s apply the option group immediately and click on the Add option. You get the following confirmation message:
Now go back to the RDS dashboard and modify the RDS instance. In Options group, select the option group we created above:
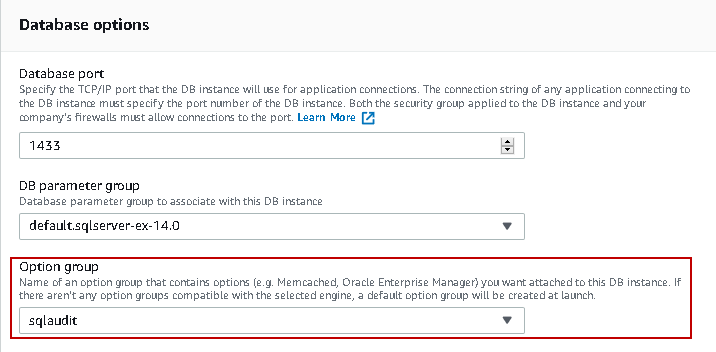
Apply this change of option group immediately:
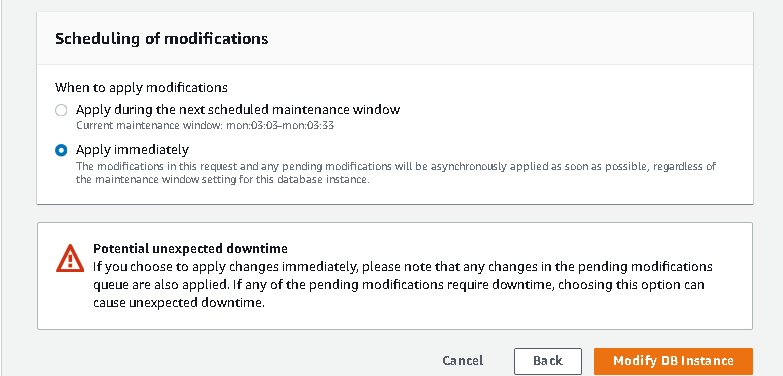
Click on Modify DB instance, and you can see status modifying as shown below:
Once the RDS instance is available, we can configure the SQL Server audit:
Create server audit specification for AWS RDS SQL Server
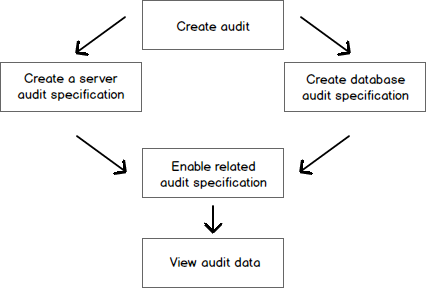
We follow the same audit process for SQL Server on-premise and RDS. Overall, we can visualize the audit process:
Connect to the RDS instance. Right-click on the audit and create a new audit:
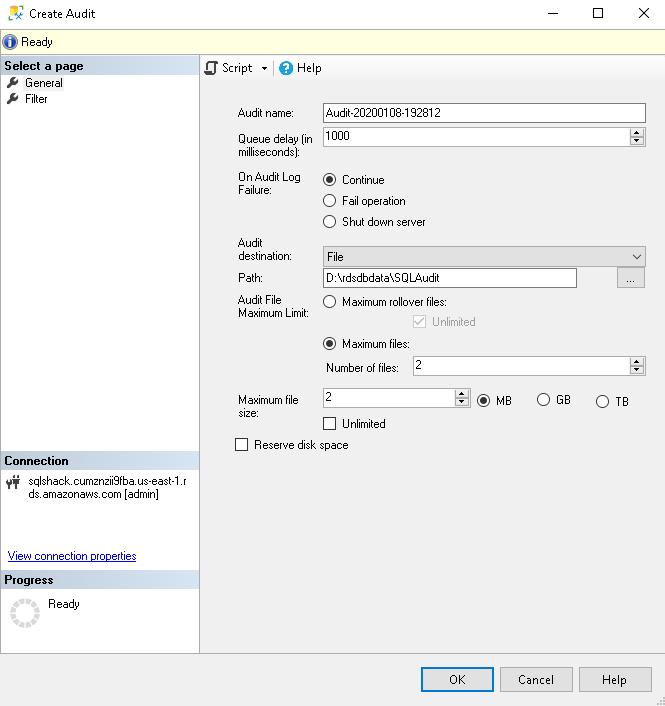
In this page, we specified the following inputs:
- Audit Name: It is the name of the SQL Server audit. By default, it gives audit name as Audit-YYYYMMDD-HHMMSS
- Queue Delay – It is the millisecond’s value that shows SQL Server needs to wait for that much time before processing audits in the file
- On Audit Log Failure: We can specify the behavior in case of audit log failure
- Continue
- Shut-down server
- Fail operation
- Audit destination: We can select the location to save the SQL Server audit. It can be either file, security or application log. In the case of a file, specify the directory to save the log file
- Maximum Rollover Files: It is the maximum number of rollover files. Once the SQL Server finishes writing to this nth number of files, it starts overwriting the previous files
- Maximum Files: We can specify either the maximum rollover files or the maximum files. For this demo, let’s specify maximum files 2
- Maximum File Size: We can specify the maximum size of a single audit file. You can specify a value in MB, GB or TB. In this article, I am specifying a maximum of 2 MB audit file
Note: We cannot configure Maximum files and MAX_ROLLOVER_FILES for AWS RDS SQL Server
Once you do the configuration, it is always recommended to generate a script. We get the following script:
|
1 2 3 4 5 6 7 8 9 10 11 12 13 14 15 16 17 |
USE [master] GO CREATE SERVER AUDIT [Audit-20200108-190542] TO FILE ( FILEPATH = N'C:\sqlshack\Audit\' ,MAXSIZE = 2 MB ,MAX_FILES = 2 ,RESERVE_DISK_SPACE = OFF ) WITH ( QUEUE_DELAY = 1000 ,ON_FAILURE = CONTINUE ) GO |
You get the following error message as an output of this script:
Msg 50000, Level 16, State 1, Procedure rds_audit_trigger, Line 175 [Batch Start Line 3]
Unable to create/alter/drop Audit/Audit specification: Max size for audit file can only be set between 2M and 50M
Msg 3609, Level 16, State 2, Line 5
The transaction ended in the trigger. The batch has been aborted.
As specified earlier, we cannot configure the Maximum files and MAX_ROLLOVER_FILES for RDS SQL Server. To resolve this error, let’s modify the script by removing the Maximum files parameter and script executes successfully:
|
1 2 3 4 5 6 7 8 9 |
CREATE SERVER AUDIT [Audit-20200108-193109] TO FILE ( FILEPATH = N'D:\rdsdbdata\SQLAudit' ,MAXSIZE = 2 MB ,RESERVE_DISK_SPACE = OFF ) WITH ( QUEUE_DELAY = 1000 ,ON_FAILURE = CONTINUE) |
Now, right-click on Server Audit Specification and create a new server audit.
We can do the following configurations:
- Name: Specify a server audit specification name
- Audit: Select the audit name we created above
- Audit Action Type: We can select the audit actions from the drop-down list. You can read more about the Sever audit actions and groups using Microsoft docs
For this article, I added the following audit actions:
- FAILED_LOGIN_GROUP
- SERVER_OBJECT_CHANGE_GROUP
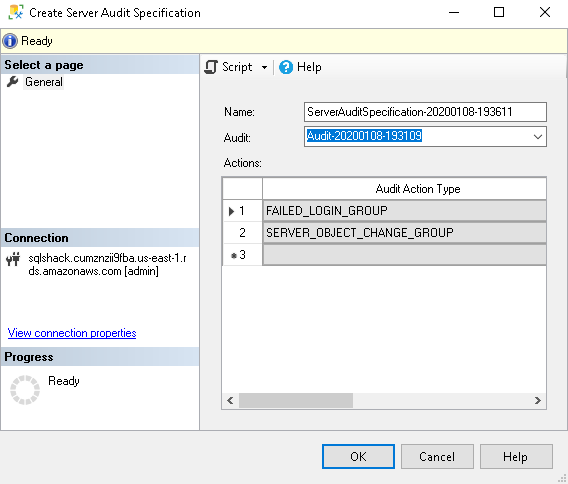
Let’s script out the server audit and execute it:
|
1 2 3 4 5 6 7 8 9 10 |
USE [master] GO CREATE SERVER AUDIT SPECIFICATION [ServerAuditSpecification-20200108-193611] FOR SERVER AUDIT [Audit-20200108-193109] ADD (FAILED_LOGIN_GROUP), ADD (SERVER_OBJECT_CHANGE_GROUP) GO |
We can see both audit and server audit in SSMS, as shown below:
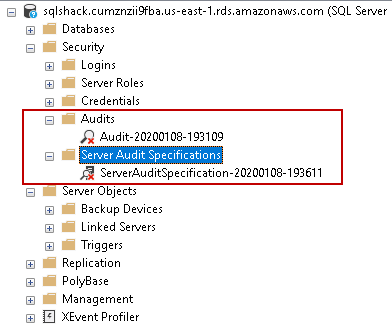
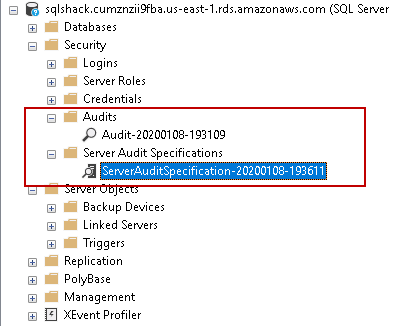
Right-click on the audit, server audit specification and enable it. Once enabled, it removes the red cross from the audits:
To generate some audit activity, let’s try some unsuccessful logins from SSMS to the AWS RDS SQL Server instance. We can do this by specifying an invalid username or password in the SSMS connection window.
We can access the SQL Server audit using the msdb.dbo.rds_fn_get_audit_file function. We can either select the required columns or use (*) for all columns:
|
1 2 3 4 5 6 7 8 |
SELECT event_time, server_principal_name, server_instance_name, statement, client_ip, application_name, file_name FROM msdb.dbo.rds_fn_get_audit_file('D:\rdsdbdata\SQLAudit\*.sqlaudit', DEFAULT, DEFAULT); |
In the following screenshot, view the audit logs for login failures:
Once SQL Server finishes writing in the audit log file, it uploads that file to the S3 bucket configured in the options group. We can execute the following command to view audit records in the retention folder:
|
1 2 |
SELECT * FROM msdb.dbo.rds_fn_get_audit_file('D:\rdsdbdata\SQLAudit\transmitted\*.sqlaudit', DEFAULT, DEFAULT); |
Similarly, you can create the database audit specification for the RDS SQL instance as well.
Conclusion
In this article, we explored the auditing on AWS RDS SQL Server. It is a critical requirement, and you should be aware of this.
See more
Interested in an enterprise-level SQL Server audit and compliance solution for GDPR, HIPAA, PCI and more, including tamper-proof repository, fail-over/fault tolerant auditing, tamper-evident repository, sophisticated filters, alerting and reports? Consider ApexSQL Audit, a database auditing tool for SQL Server

- Understanding PostgreSQL SUBSTRING function - September 21, 2024
- How to install PostgreSQL on Ubuntu - July 13, 2023
- How to use the CROSSTAB function in PostgreSQL - February 17, 2023


