In this article, we will review how to set up Geo-Replication on Azure SQL databases. Geo-Replication is an Azure SQL database feature that allows you to create a readable secondary database in the same region or cross-region. We can failover to the secondary database in case of an outage for a long time on the primary database server. We can also use this feature to migrate a database from one server to another server in the same or cross region with minimal downtime. Geo-replication uses the Always-on feature to replicate committed transactions to the secondary database asynchronously.
Let us go step by step to configure Geo-Replication on an Azure database. In this demo, I am using Azure single database.
Configuring the Geo-Replication on Azure SQL database
Log in to the Azure portal and navigate to SQL databases. Click on the Azure SQL database on which you are going to configure the Geo-Replication.
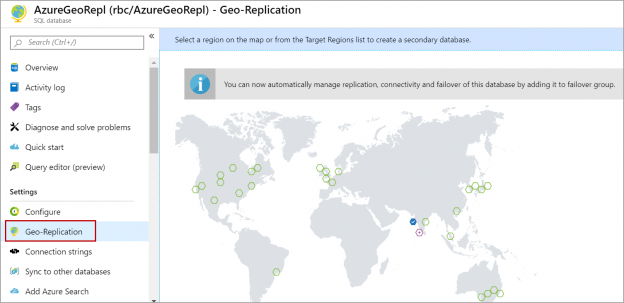
Click on the Geo-Replication tab in the database details page.
Select the target region from the list of target regions shown. In this case, the primary database is located in West India and I selected the target region (secondary database region) as South India.
Click on the Target Server. All the available Azure database servers in the target region are shown in the list. Select one if you want to use an existing Azure database server or create a new Azure database server by clicking on Create a new Server. Enter the Azure SQL server name, admin login, and password. Click on Select and Ok.
The Geo-Replication setup is progressing, and you can see it on the map. It shows a dotted line as shown in the below image when the setup is in progress. Once the setup is complete it shows a full line between the source and target regions.

In the Geo-Replication page under the map, we can see the details of primary and secondary databases and the status of the database.

We can also create Geo-Replication using below T-SQL script. The following T-SQL script should be executed on the master database at the Azure SQL primary server. Replace the database name and the secondary server name in the T-SQL script. If the database with the same name already exists on the secondary server, the below T-SQL script throws an error “The destination database name ‘ActiveGeoRepl’ already exists on the server”
|
1 2 3 |
ALTER DATABASE AzureGeoRepl ADD SECONDARY ON SERVER rbc2 WITH ( ALLOW_CONNECTIONS = ALL ) |
We can create up to four secondaries for each primary database. As the transactions are replicated asynchronously to the secondary database may lag the primary database at any point in time.
Geo-Replication supports only manual failover and the end-point connection must be changed in the application after the failover. The secondary must have the same firewall rules and the logins to run applications successfully without any discrepancies after the failover to the Azure SQL secondary database.
Failover
Execute the following T-SQL script for a planned failover which makes the secondary database online without data loss. This T-SQL script should be executed at the secondary server on the master database.
|
1 |
ALTER DATABASE AzureGeoRepl FAILOVER |
Once the above command is executed on the secondary server, it stops all the connections to the existing primary database, replicate all the transactions to the secondary database and make the secondary database online.
Forced Failover
For a forced failover, click on the secondary database to which you want failover and click on Forced Failover. This will make your secondary database immediately online and start accepting connections. Forced failover may result in data loss.

Alternatively, we can use the following T-SQL script on the master database at the secondary server for a forced failover which immediately brings the secondary database online.
|
1 |
ALTER DATABASE AzureGeoRepl FORCE_FAILOVER_ALLOW_DATA_LOSS |
Removing Geo-Replication
To remove Geo-replication on an Azure database, navigate to the database details page and click on Geo-Replication. Just under the map locate the secondary server and click on Stop Replication. Please refer to the below image.

Alternatively, you can also use the following T-SQL script to remove Geo-Replication between primary and secondary databases. This T-SQL script should be executed on the master database at the primary server.
Replace the database and the secondary Azure SQL server name with yours.
|
1 2 |
ALTER DATABASE AzureGeoRepl REMOVE SECONDARY ON SERVER rbc |
Geo-Replication on a secondary database.
In case we want to have more than four secondary databases for a given primary database, configure the Geo-Replication on a secondary database so that the secondary database itself will have another secondary database. Execute the following T-SQL script on the master database at the secondary server to create a Geo-Replication from a secondary database to another secondary database.
|
1 2 3 |
ALTER DATABASE ActiveGeoRepl ADD SECONDARY ON SERVER rbc3 WITH ( ALLOW_CONNECTIONS = ALL ) |
Conclusion
In this article, we explored how to create Geo-Replication on an Azure SQL database, how to manually do a planned failover without data loss and forced failover which may have a data loss. In case you have any questions, please feel free to ask in the comment section below.
- Geo Replication on Transparent Data Encryption (TDE) enabled Azure SQL databases - October 24, 2019
- Overview of the Collate SQL command - October 22, 2019
- Recover a lost SA password - September 20, 2019


