In this article, we will review how to set up auto-failover groups in Azure SQL Server and how failover group is different from active geo-replication in Azure. Auto-failover group is an Azure SQL database feature that replicates one or a group of databases to the secondary Azure SQL server in the cross-region. We cannot have a secondary server in the same region. This feature is used to failover all the databases in the failover group in case of disaster and the failover is automatic.
Auto-failover group uses the same underlying technology as geo-replication. The following are some of the differences between auto-failover groups and active geo-replication.
- Geo-replication replicates a single database to the secondary whereas auto-failover groups replicate a group of databases that are added to the failover group
- Auto-failover supports managed instances whereas geo-replication does not
- Both manual and auto-failover are available in auto-failover groups whereas only manual failover is possible in Azure SQL active geo-replication
- Auto-failover supports only one secondary server. If you need multiple secondary databases, consider using active geo-replication
Please refer to Azure SQL database Geo-Replication to set up geo-replication on an Azure SQL database.
Let us go step by step to configure auto-failover group on an Azure SQL server.
Configuring Auto-Failover group on Azure SQL server
Log in to the Azure portal and go to the SQL Server page. You can search for SQL Server in the search box. Please refer to the below image.
Click on the server on which you are going to configure failover groups. In the server details page, click on Failover groups.

Click on the Add group. Enter the failover group name which used to connect the current primary server. Select the secondary server if you already have one in different region else create a new SQL server in a different region. The secondary server in the same region is not supported in failover groups in Azure SQL Server.
Select the read/write failover policy. Select Automatic if you need automatic failover when the primary goes down. Select the read-write grace period.
As the data is replicated asynchronously, the immediate failover may result in data loss. So, we must set the grace period accordingly to reduce data loss. The grace period is the time the SQL service waits before triggering automatic failover when an outage occurs.
Add the databases to the group that you want to failover to the secondary and click on Create as shown below.
Once the failover group is created and the seeding of the databases is done, two endpoints are created. One with the provided failover group name which is read-write listener endpoint and it always points to the current primary server in the Azure SQL Server failover group. The other one is a read-only listener endpoint which always points to the secondary server in the failover group.
To know the endpoints, navigate to failover groups and click on the name of the failover group. Under the map, you can see the primary, secondary server details, and the read-write, read-only listener endpoints.
Manual Failover
To do a manual failover, navigate to failover groups and click on the name of the failover group. In failover group details page click on failover as shown in the below image.

When a planned failover is imitated, the secondary databases are fully synchronized with Azure SQL primary databases before switching the roles. In this case, there is no data loss.
Once the failover is successful, the existing primary becomes secondary and the existing secondary becomes primary. The pointing of read-write and read-only listener endpoints are changed automatically.
Forced Failover
In the failover group details page, click on Forced failover to do a manual forced failover which immediately switches the roles without synchronizing with primary. This may result in data loss.
Adding a database to the existing failover group
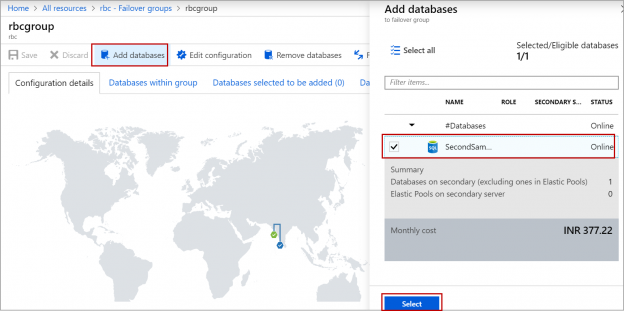
We can always add a database of the same Azure SQL Server to an existing failover group. When a new database is added to the existing failover group, it automatically creates a new database in the secondary server with the same name, edition and computes. To add a new database to an existing failover group, Click on the failover group in the Azure SQL Server details page. Click on the failover group name and click on Add databases.
All the available databases which are not added in any failover group are shown in the list. Select the database you want to add to the failover group and click on Select. One such example is shown below.
After selecting the new databases, click on Save to save the changes to the failover group. Please refer to the below image.

Similarly, to remove databases from an existing failover group, click on Remove databases. Select the databases you want to remove and click on Save.
Conclusion
In this article, we explored how to create auto-failover groups in Azure SQL Server and the differences between auto-failover groups and active geo-replication. In case you have any questions, please feel free to ask in the comment section below.
- Geo Replication on Transparent Data Encryption (TDE) enabled Azure SQL databases - October 24, 2019
- Overview of the Collate SQL command - October 22, 2019
- Recover a lost SA password - September 20, 2019


