This article gives an overview and deployment steps for SQL Elastic Pool for Azure SQL database.
Requirement of SQL Elastic Pools
Suppose you got a business requirement to configure multiple Azure SQL Databases for different customers. Usually, you deploy a single database for each customer, and each database has its service tiers, resources. It is challenging to predict database load due to unpredictable user patterns. In this case, you might end up with under-provision or over-provision resources. The billing also occurs on an individual database.
You are required to provisioning Azure databases based on peak utilization to run the database activities smoothly. However, such over-provisioning of system resources (as per peak load) would not be cost-effective because of idle resource time for most of the time.
The following screenshot depicts a database usage pattern with periodical spikes, and the database remains idle most of the time.
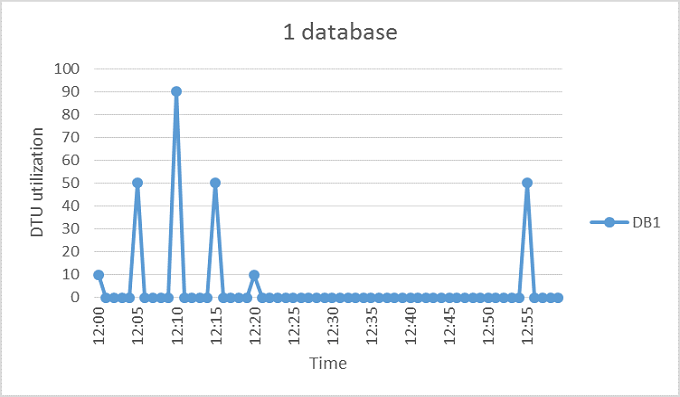
Suppose you have provisioned your resources based on the peak database load. In this case, you might be paying for higher resources but not consuming them all the time.
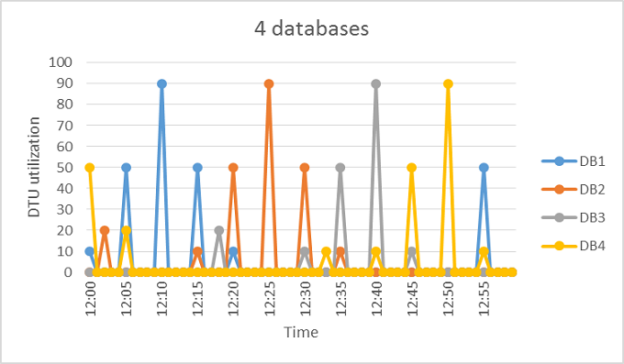
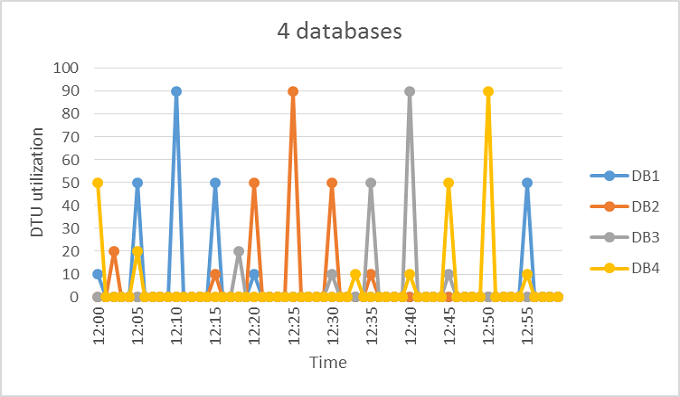
If you have a few more databases with similar usage patterns, we can share the resources across multiple databases. As shown below, the overall DTU utilization still peaks at 90. Therefore, with the shared resources among multiple databases, you can benefit from reducing overall cost. The rest of the databases take benefit of the higher DTU or vCPU configurations that increase database and application performance.
How can we do this resource pooling in Azure SQL Database? Let’s figure it out in this article.
SQL Elastic Pools for Azure SQL Database
The elastic pools in Azure DBs implement a cost-effective solution suitable for unpredictable usage demands. These elastic pools can configure multiple SQL databases with resource pooling. Therefore, you have the flexibility to build a high-end database server, and your databases can leverage that based on their workload requirements. These elastic pools enable you to optimize costs for several databases without compromising performance.
Note: Azure does not bill individual databases in the elastic pools, and it charges you for each hour a pool exists at the highest vCores or eDTUs.
- You can configure the elastic pools in either vCore or DTU purchasing models
- It allows configuring minimum and maximum resources for a database
- The databases can auto-scale within the elastic pool. For example, the database can consume high resources under heavy load while consuming minimum assigned resources in idle time
Creating a new SQL elastic pool for Azure SQL Database using the Azure portal
To create a new elastic pool, authenticate yourself in the Azure portal and search for SQL elastic pools.
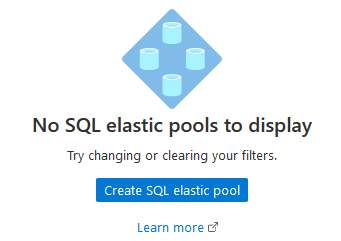
Click on the hyperlink- Create SQL elastic pool. In the elastic pool details, enter a pool name as highlighted below.
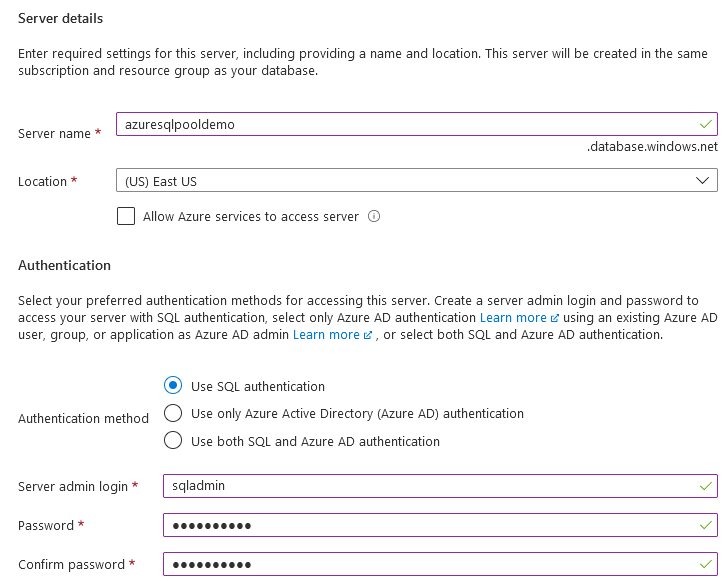
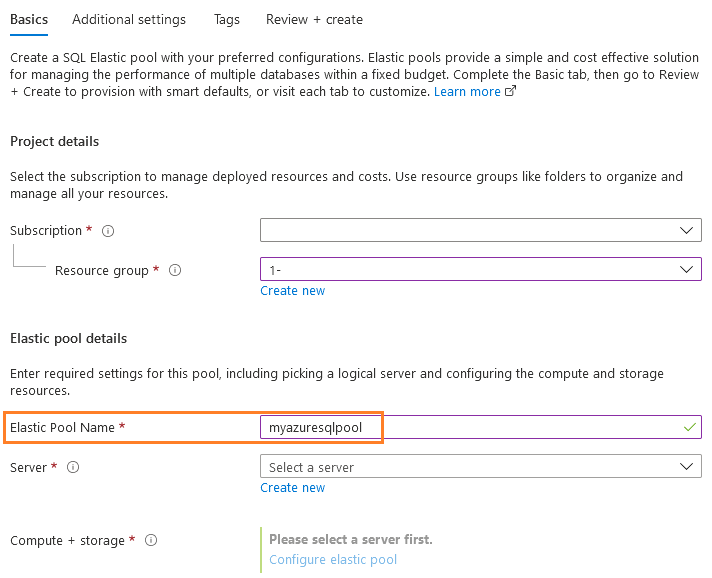 Click on create a new server. It opens another Create SQL Database Server page that requires Azure server name, location, and authentication method.
Choose an option – Use SQL authentication and specify server admin credentials. If you have Azure AD configured, you can choose Azure Active Directory authentication as well.
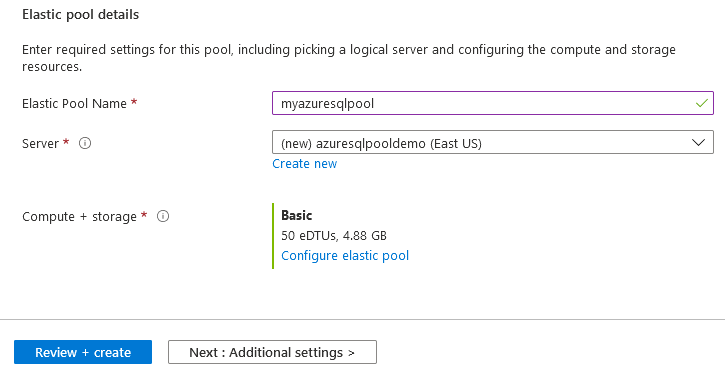
The next part is to configure Compute + storage. By default, it shows General Purpose Gen5, 2 vCores with 32 GB.
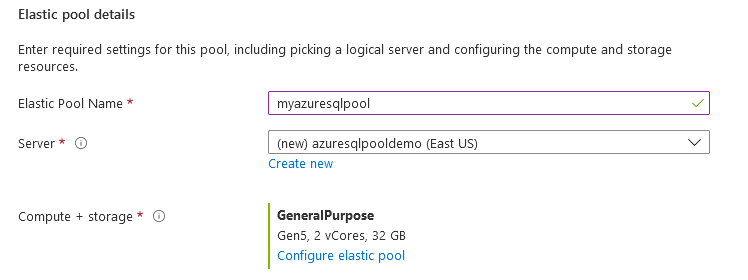
Click on Configure elastic pool, and you get options to configure Pool settings and per Database settings.
Pool settings:
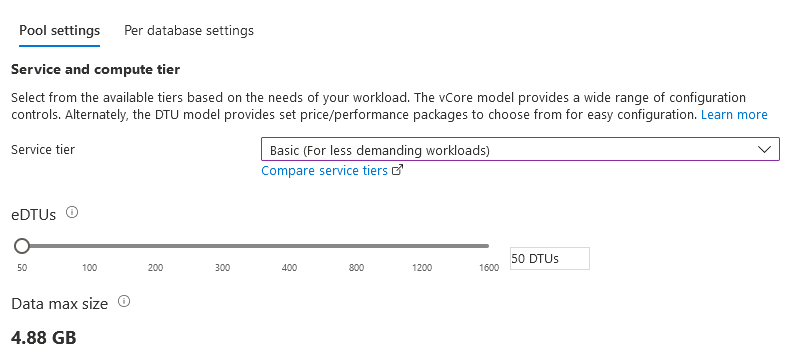
The pool setting requires a service tier from V-Core and DTU based purchasing models.
-
V-core based purchasing model
- General Purpose
- Business-critical
-
DTU-based purchasing model
- Basic
- Standard
- Premium
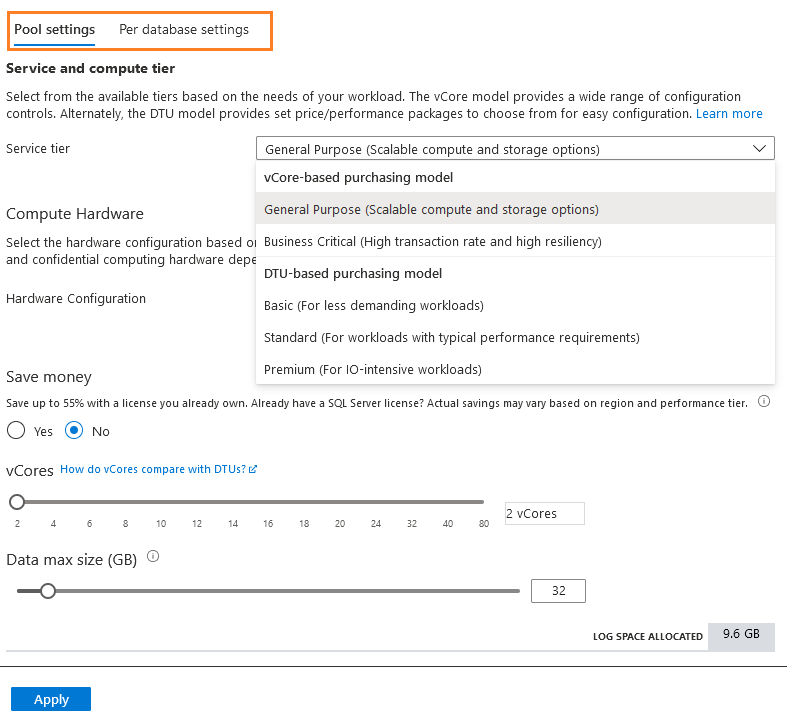
The hardware configuration depends on the chosen purchasing model and service tier. For this example, I am selecting the DTU-based purchasing model and the Basic service tier.
Per database settings
The per-database setting can configure the minimum and maximum resources. You can use this to configure to distribute DTUs to avoid a specific database consuming all or none of the resources.

The elastic pool configuration for my demo is as below.
Additional settings
Specify a preferred database maintenance window from the drop-down list. The default value is 5 pm to 8 am.

Review your elastic pool configurations before deployment.
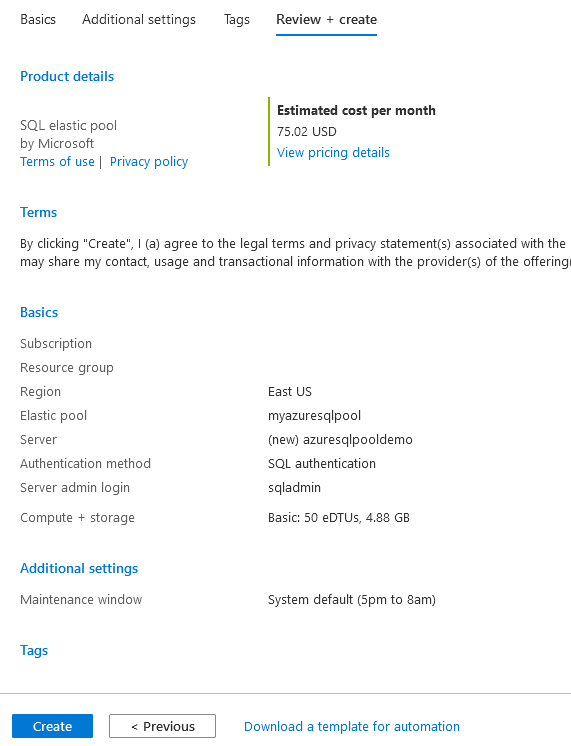
Click on create and deploy Azure SQL Database elastic pool.

The elastic pool dashboard displays resource configuration, elastic databases, and elastic database settings. As shown below, there is no database in the elastic pool.

To add a database in the elastic pool, you get the following two options.
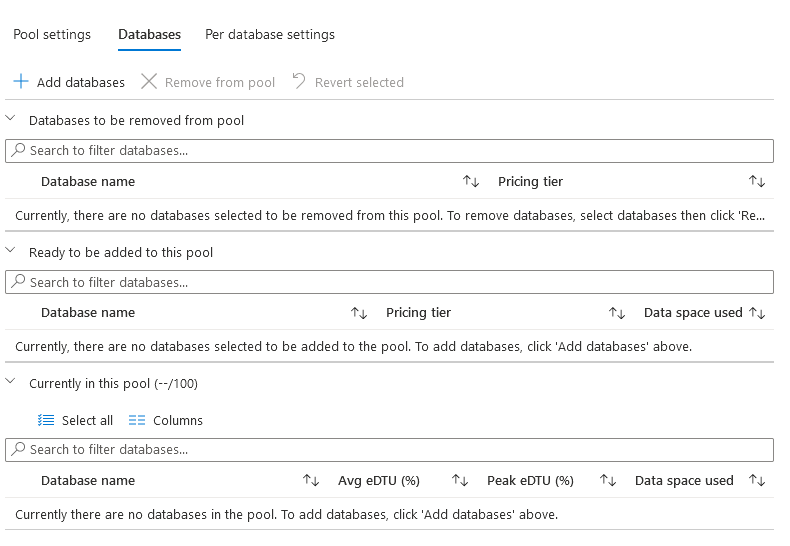
- Click on 0 databases: You can add or remove the database from the elastic pool using this option. If you have an existing database on the Azure SQL Server, you can add that from this option.
- Create database: You can create a new Azure SQL Database from this create database option. Specify a new database name and server field that shows the Azure server configured earlier.
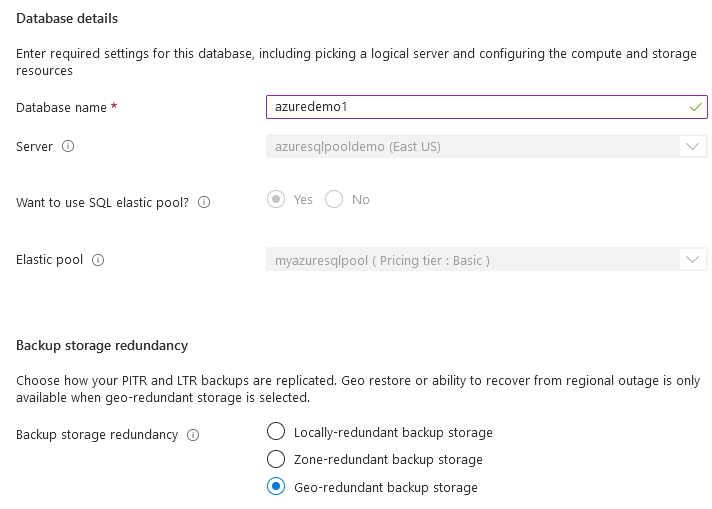
If you deploy an Azure SQL Database, you can choose the deployment model and service tiers. You can note here that the console did not get the option to specify a deployment model while we created a new database for the elastic pool.
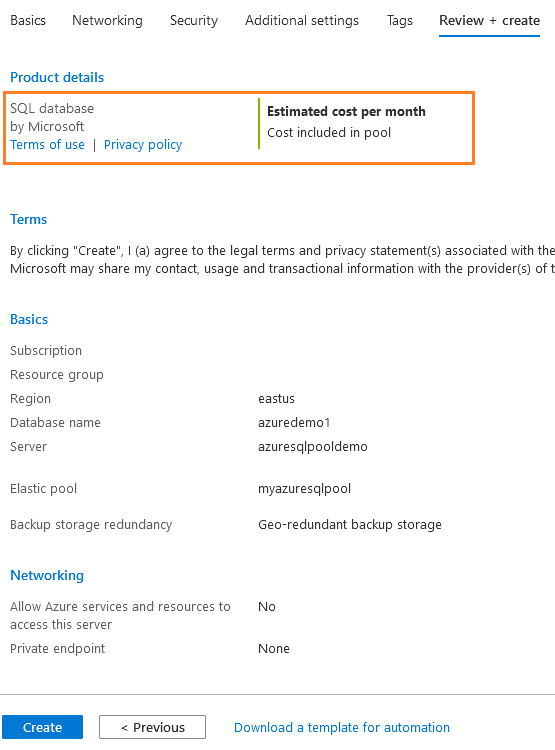
On the review page, it does not display deployed database price. It stats cost included in the pool.
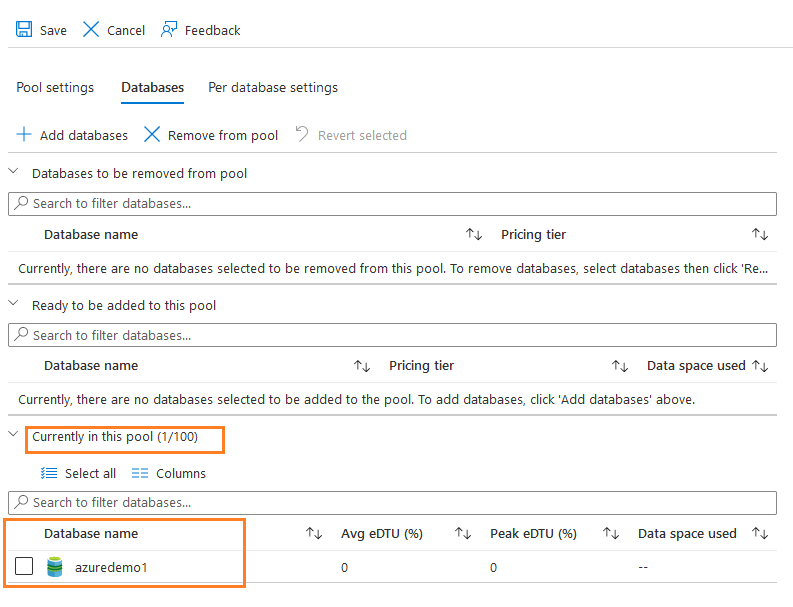
Once the database is deployed, you can view the database in the section- Database currently in the pool as shown below.
Add an existing Azure SQL Database into the SQL elastic pools
Suppose you have an existing database in Azure SQL Server that is not part of the elastic pool. You can add that database into the elastic pool.
Click on Add databases, and it gives the list of database present in Azure SQL Server that is not part of the elastic pool.
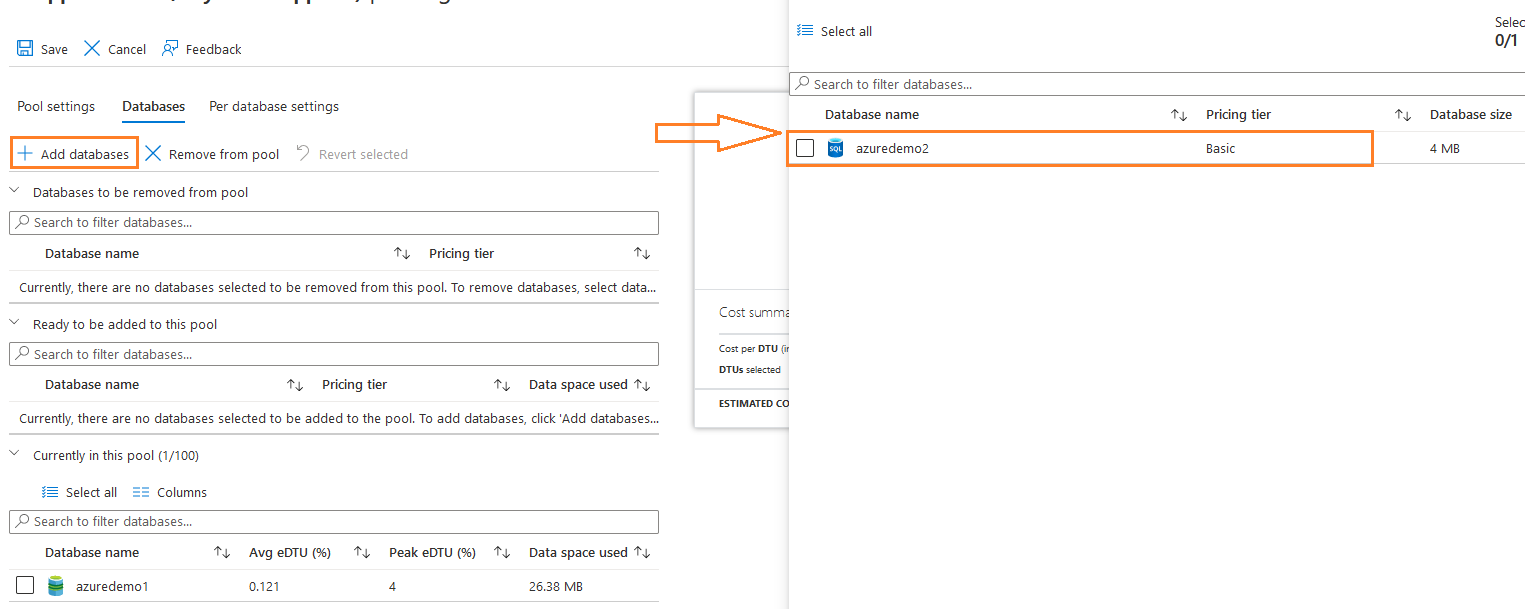
For example, it shows a database [azuredemo2] to add into the elastic pool. Click on Save, and it lists the database into the option – Ready to be added to this pool.
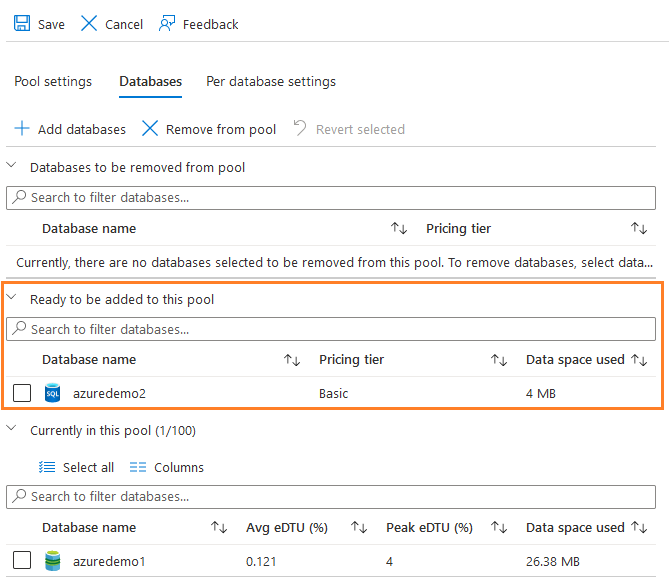
Click on Save, and it starts a deployment to add Azure SQL Database into the elastic pool.
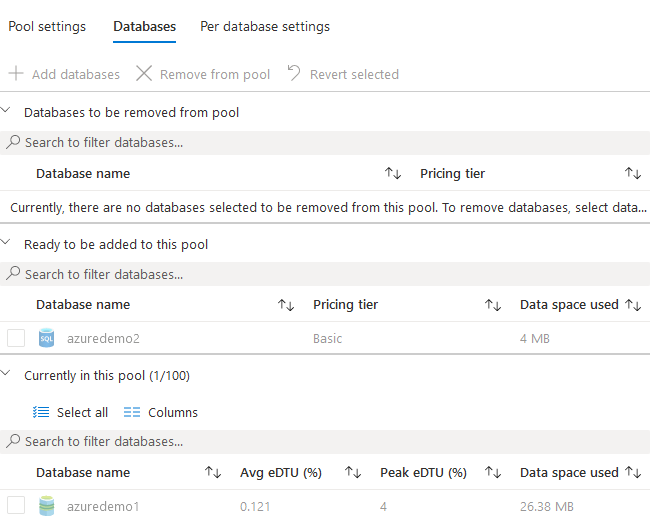
The following figure shows two Azure databases into the elastic pool and their Avg eDTU(%), Peak eDTU(%), and data space used.

Remove a database from the SQL elastic pool
We can move a database out of the elastic pool if required. Select the database and click on Remove from the pool to remove a database from the elastic pool. For example, the following screenshot tries to remove the database [azuredemo2] from the elastic pool.
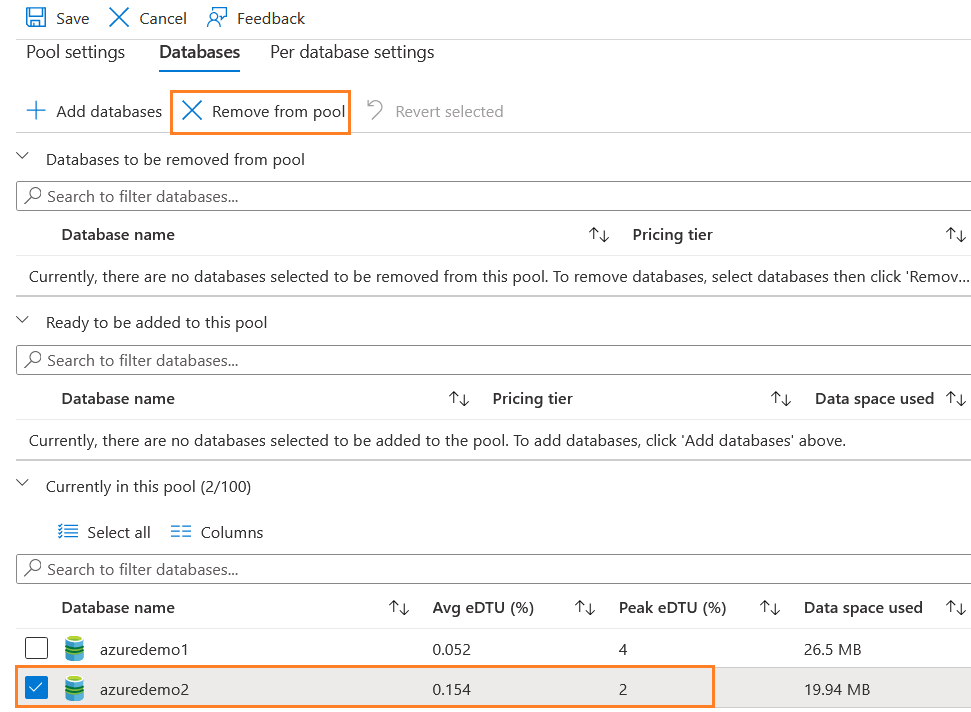
It moves the database into the section – Database to be removed from the pool.
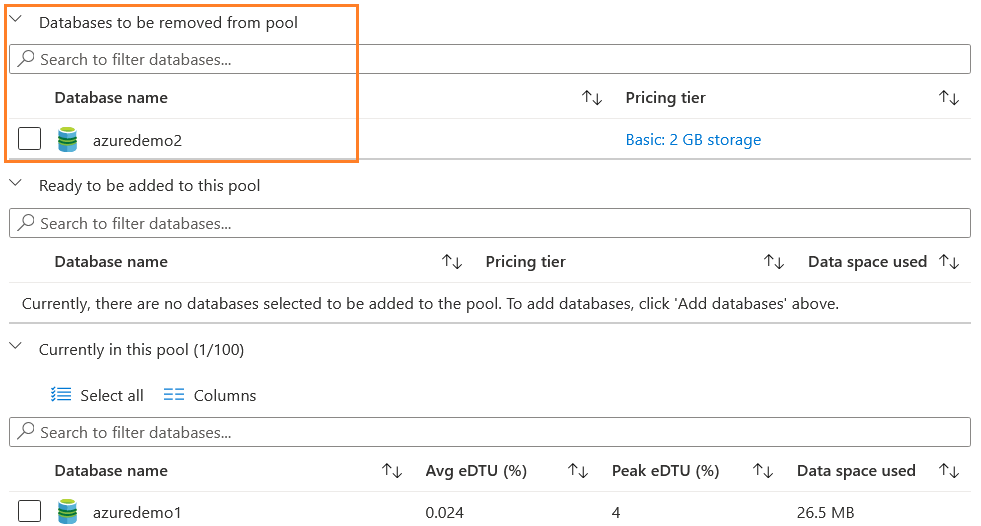
Click on Save, and it starts deployment to move the database out of the elastic pool.

At the end of the deployment, you do not see the removed database part of the elastic pool.

Note: If we move the database into or out of the elastic pool, users might notice a minor (few seconds) downtime at the end of the operation.
Business continuity for databases in a SQL elastic pool
The Azure SQL Database in an elastic pool supports business continuity options such as Point-in-time restore, Geo-restore, and Active-geo replication. You can refer to https://www.sqlshack.com/category/azure/ for an existing article for these technologies.
Customer case studies
The SQL elastic pools are used if you are unaware of the database workload patterns and require cost-effective and maximum usage of your Azure resources. To understand its usage, I would suggest going through the following case studies.
Conclusion
In this article, we explored SQL Elastic pools in Azure SQL Database. Later, we deployed the database into an elastic pool. You can add or remove an existing database from Azure SQL Server in the elastic pool with minimum disruption in database availability. It can use both DTU or vCore purchasing models for computing requirements.
- Understanding PostgreSQL SUBSTRING function - September 21, 2024
- How to install PostgreSQL on Ubuntu - July 13, 2023
- How to use the CROSSTAB function in PostgreSQL - February 17, 2023

