
In this article, you will see how to use the Extract function in Power BI to extract information from columns in a Power BI dataset.
For those of you who are not familiar with Power BI, it is Microsoft’s data analysis and BI tool. It is available under a number of different licenses (see this Power BI article for full details licensing) but in this article, we use the free Power BI Desktop which is available free.
While Microsoft’s Power BI comes with a lot of options for data analysis, one of the most exciting options is its ability to extract specific information from within a column. For example, with Power BI you can extract year, months, days, hours etc. from a complete date. You can also create new categories using a range of data.
In this article, we will look at a number of examples of using the extract function in Power BI.
Importing the Dataset
As Power BI is a data analytics tool, it goes without saying that you need to import data into Power BI before it can be analyzed. To demonstrate the use of the extract function in Power BI, we will use a freely available dataset on Boston crime that contains information about incidents that took place in Boston. The dataset is freely available at this Kaggle link. Download the dataset. You will be using the “crime.csv” file from the downloaded dataset. Follow these steps to import the dataset into Power BI.
Open the Power BI desktop application. From the dashboard click the “Get Data” option (in the top menu) and then select the “Text/CSV” option from the list of options that appears asking you to define what type of dataset you are working with. Finally, click “Connect”.

The dataset will now be imported into Power BI (see screenshot below).
Now you have two options:
- You can directly import the data to reports view by click the “Transform Data” button, or
- You can import the data to the “Query Editor” by clicking the “Load” button
The extract function in Power BI is available in the Query editor, so please click the “Load” button to import the data.

Accessing Extract Function in Power BI
In the query editor, you have two options when using the Extract function. You can access the “Extract’ function from the “Add Column” menu as shown below.

The other way to select the “Extract” function is via the “Transform” which is in the top menu as shown below.

There is one main difference between the extract function in the “Add Column” menu and the extract function in the “Transform” menu. When you apply the “Extract” function via the “Add Column” menu, a new column is created and your extracted content appears in that new column. When you apply the extract function in Power bi via the Transform menu, no new column will be created. Instead, the extracted text will replace the old text in the same column.
Let’s look at both of these in more detail.
Extracting Content via the Add Column Menu
Let’s first see a couple of examples of extracting content using the extract function in Power BI from the “Add Column” menu.
Extracting Text
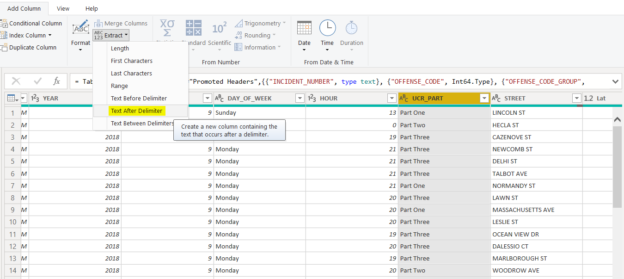
If you look at your dataset, you can see that it contains a “UCR_PART” column. This contains text like “Part One”, “Part Two” and “Part Three”. Let’s extract the number in the form of text i.e. “One”, “Two” and “Three” from the “UCR_PART” column.
To do this, click the header of the “UCR_PART” column, go to the “Add Column” option from the top menu, and then select the “Extract” function. From the dropdown list, select “Text After Delimiter”.

We want to extract the text that exists after a single space. In the dialogue box that has appeared (shown below), enter a single space and then click “OK”.

You will now see that a new column has been inserted after the last column called “Text After Delimiter”. You can see that the column only contains the numbers in the form of text i.e. “One”, “Two”, “Three”.

You can rename the column name by clicking the column header and typing a new name. In the following screenshot, I’ve changed the column name to “UCR_PART_INTEGER”.

Next, let’s try changing the text numbers into digits. You can do this by clicking “Replace Values” from the “Transform” menu as shown.

In the replace values dialogue box, replace the text “One” with the digit ‘1’. Repeat the same step to replace “Two” with 2, “Three” with 3 and so on.

If you look at the newly created “UCR_PART_INTEGER” column you will see that it contains “ABC” before the column header name, which shows that it is a text column. However, the “UCR_PART_INTEGER” column now contains integers. To convert it to an integer type, click the “Detect Data Type” option from the “Transform” menu and you will see that the column type is changed to numbers as shown below:

Extracting the Day from a Date
With the extract function in Power BI, you can also extract information such as the year, month, day, or time from a date-time column.
We will extract the day of the month from the “OCCURRED_ON_DATE” column. If you look at the column, the day of a month is located inside two forward slashes. To extract the day, you use the “Text Between Delimiters” option of the extract function in Power BI.

Enter a forward slash “/” in both the “Start delimiter” and “End delimiter” fields as depicted by the following figure and click the “OK” button. This selects what is between the first two forward slashes in the field.

You will see a new column containing the day of the month now appear at the end of the list of columns. Rename the column to “Day of Month”.

Click the column header and drag it next to the “MONTH” column. Look at the following screenshot for reference. Here you can see that Day of Month column contains the day value as shown in the “OCCURRED_ON_DATE” column.

Extracting the Time from a Date
Like the day, you can also extract the time from the “OCCURRED_ON_DATE” column. You can see that there is a single space between the date and time information. This means that again you can use the “Text After Delimiter” option from the extract function in Power BI to extract the time.
As we did previously add a single space in the “Text After Delimiter” field and click “OK”. Again a new column “Text After Delimiter” will be created. You should rename it “Time”.
The type of the newly created time column is “Text” at the moment. Again click the “Detect Data Type” option from the “Transform” menu, the “Time” column will be converted into a date-time column. This is shown by the clock icon which will now be visible before the column name in the “Time” column. Look at the following screenshot for reference.
![]()
Extracting Content via Transform Menu
As mentioned in the introduction, you can also use the Transform menu to extract text from a column. However, no new column will be created. Instead, the extracted text will replace the text in the selected column. Let’s look at an example.
Let’s transform the DISTRICT column by extracting only the numbers from the DISTRICT column. If you look at the DISTRICT column it contains the alphabet A, B, C, D or E, followed by a single- or two-digit number.
Let’s extract the last two characters from this column. Select “Transform” from the top menu and then click “Extract”. From the dropdown list, select “Last Characters

In the “Extract Last Characters” dialogue box, enter 2 and then click OK.

You will see that the DISTRICT column will be updated to now contain only the last two characters from the original values.

Since we want the DISTRICT column to contain numbers only, we will need to remove the letters by replacing them with empty spaces. To do this select the “Replace Values” option from the “Transform” menu.

You will see that the DISTRICT column now contains only digits.

Finally, remember to change the type of the DISTRICT column from text to numeric by using the “Detect Data Type” option from the “Transform” menu.
Conclusion
This article has explained how to use Extract function in Power BI. We’ve looked at examples of using it to both insert new columns to contain the output, thus preserving the data we have run it on, and also using it to replace the data that we have run it on.

View all posts by Ben Richardson
- Working with the SQL MIN function in SQL Server - May 12, 2022
- SQL percentage calculation examples in SQL Server - January 19, 2022
- Working with Power BI report themes - February 25, 2021