In this article, I’m going to explain in detail about the SQLPackage utility that is provided by Microsoft in order to automate database deployments. In my previous article regarding Data-Tier Applications in SQL Server, I have mentioned how to create a DACPAC and a BACPAC file from an existing SQL Server Database. The underlying technology behind creating the DACPAC and the BACPAC files is the SQLPackage utility, which helps to create those files.
The SQLPackage utility is a cross platform, command line tool and can be installed on Windows, Linux and MacOS. You can easily download the utility from the official website based on the operating system you are using. At the time of writing this article, the latest version of the utility is 18.5, however, it may change if you are reading it at some later point.
Installing the SQLPackage Utility
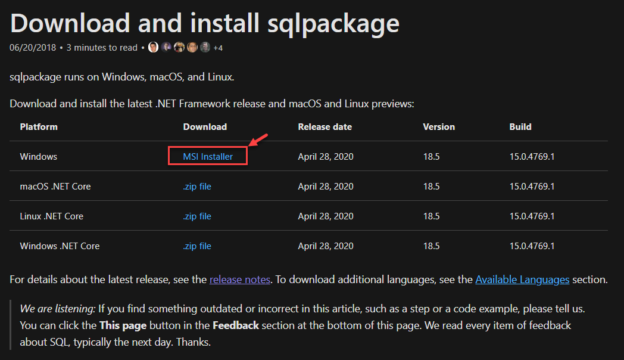
Let’s head over to the official website and download the windows MSI installer file and start installing the package on the local machine.

Figure 1 – Download SQL Package
The name of the downloaded file will be DacFramework.msi. Click on the file and start installing it.

Figure 2 – Install the SQL Package
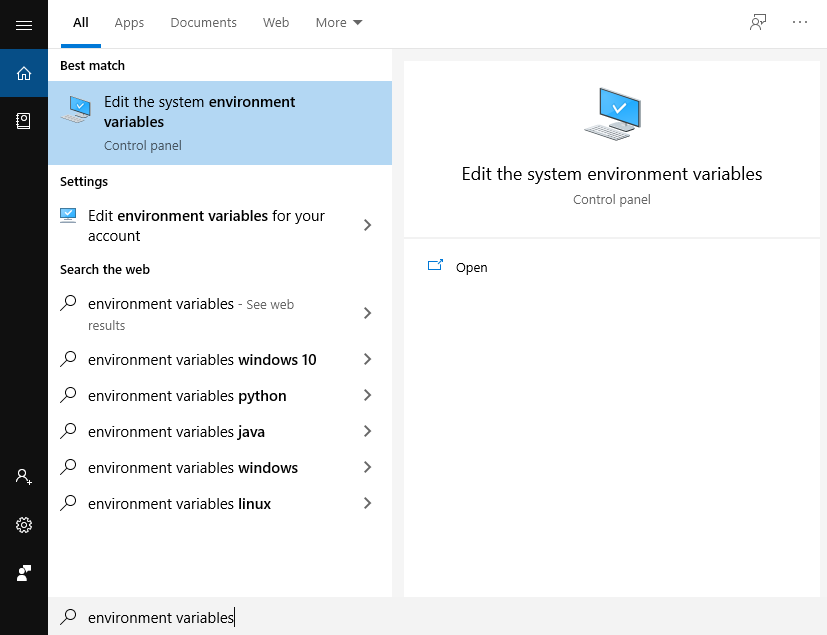
Once the package is installed successfully, lets move to set the environment variables so that we can start using the SQLPackage utility from the command line directly. Click on the Start button and search for Environment Variables. Select Edit the system environment variables. A new dialog box will open.

Figure 3 – Edit Environment Variables
Click on the Environment Variables button…

Figure 4 – Environment Variables
In the next step, click on the New button and then add the binary file path of the DAC program directory. In my case, the executable file for the SQLPackage is usually located at “C:\Program Files (x86)\Microsoft SQL Server\140\DAC\bin“. Once the path has been added click on OK.

Figure 5 – Added path for the Executable File
Now that the path of the executable has been added to the system variables, we can directly call the SQLPackage from the command-line. Start the command prompt and type SQLPackage and press Enter. If the package has been installed successfully and the path set correctly, you will see the options from the package.
Figure 6 – SQLPackage from Command Line
Using the SQLPackage Utility and Actions
The SQLPackage can be used to perform several different database functions like deploying a DACPAC file to a database, creating a DACPAC from an existing database, comparing the schema between two different databases and so on. In order to achieve these, the utility offers the following functions or actions which are discussed in detail in the next section.
The common syntax to execute the commands are “SQLPACKAGE <<PARAMETERS>> <<PROPERTIES>> <<SQLCMDVARIABLES>>“. You can add multiple parameters to a command to perform complex tasks. The SQLCMD variables are used to pass variable values to a parameterized script which can be executed against a SQL Server database.
The following actions are performed by the SQLPackage which are described below:
- Extract: This action is used to create a DACPAC file from the SQL Server database. For this, a database needs to be up and running in the server before creating the DACPAC file. The source database can be either SQL Server or Azure SQL Database. The utility connects to the source database using the connection string provided and then extracts the DACPAC file to the local path specified while initiating the command
- DeployReport: This action is used by the database administrators to generate an XML report that provides the list of the changes that are going to be applied to a database when it is published. The utility compares the source database or the DACPAC file to the target database and generates the report based on the schema
- DriftReport: This is also another action that generates a list of changes that has been applied to a published database after it has been registered. For example, let’s consider a database has been published today and after a few days some changes were applied to the database directly. The DriftReport will generate a list of changes that has been applied to the database since the day it was published
- Publish: This is the most widely used action according to me. It is used to publish a database from a DACPAC file. The magic here is that the utility automatically detects the state of the database on the server and then incrementally updates it based on the information available. For example, if in the target location, the database is not present then the utility will create the database as a fresh, otherwise it will incrementally update the schema changes which is present in the DACPAC and not within the database
- Script: This is the action which generates a T-SQL script after comparing the schema difference between the source and the target database and saves the file to the local machine. This script is also an incremental T-SQL script, which means that if the target database is not present then it will create it otherwise it will just update the database
- Export: This action is used to create a backup of a live SQL Server database or Azure SQL Database. The data along with the schema is exported to a BACPAC file. The utility connects to the source database and then creates the BACPAC file on the local machine. This action might take some time depending on the size of the database as there is going to be data movement
- Import: This is the exact opposite action to the Export action. It is used to import a BACPAC file to a SQL Server instance or an Azure SQL Database instance. The utility considers the BACPAC file as the source and then restores the database along with the schema and data to the SQL Server database
Parameters of the Publish Action in SQLPackage Utility
In the previous section, we have seen several Actions that are supported by SQLPackage. Now let us go ahead and learn the most important parameters that are available to be used within these actions. Apart from the parameters mentioned in this article, there are several others which are available to use and you can see those in the documentation.
- Action: This specifies the action that we are trying to achieve using the SQLPackage utility. It can be anything from the above-mentioned actions. In order to deploy the database, the action should be “Publish”
- SourceFile: Usually, in order to deploy the database from a DACPAC file, we need to specify the location of the file. This can be done by specifying the path in the “SourceFile” parameter
- TargetDatabaseName: This parameter is used to specify the name of the database in the SQL Server. The DACPAC file will the deployed against this database name and specific actions will be taken forward
- TargetServerName: As it goes by the name, the server to which the database is going to be deployed is mentioned here
For the purpose of this article, I am going to demonstrate the Publish action of the SQLPackage utility. The command to publish a DACPAC file is as below:
sqlpackage
/action:Publish
/SourceFile:”C:\temp\SQLShackSnapshot.dacpac”
/TargetDatabaseName:SQLShackSnapshot
/TargetServerName:”localhost”
Figure 7 – Database Snapshot Published
If you see the output in the above screen, you can see that the SQLPackage has successfully connected to the target server and then created a database based on the schema available in the DACPAC file. This utility can also publish to remote SQL Server machines instead of a local host or even to Azure SQL Database.
Conclusion
In this article, we have seen the basic features of SQLPackage utility. SQLPackage is an important utility when modern database development and deployment is taken into consideration. It can be easily used create new databases or updated existing databases with minimal configurations. In my upcoming articles, I will also explain about the other actions that are possible with this utility in detail.
- Getting started with PostgreSQL on Docker - August 12, 2022
- Getting started with Spatial Data in PostgreSQL - January 13, 2022
- An overview of Power BI Incremental Refresh - December 6, 2021


