Recently, I was asked if I can write and run a specific query and have the results, (if any) emailed to a specific group of people every day? But only send the email if the query returns results. Who wants to open and empty email after all?
As with any DBA, we need a way to automate this process, as our time is valuable. Who wants to manually run a script, paste it into excel and then email it directly to users every morning?
First things first, setup Database Mail if you haven’t already. (If you have already, feel free to skip this section).
The best way to do this is to use the Database Mail Configuration Wizard.
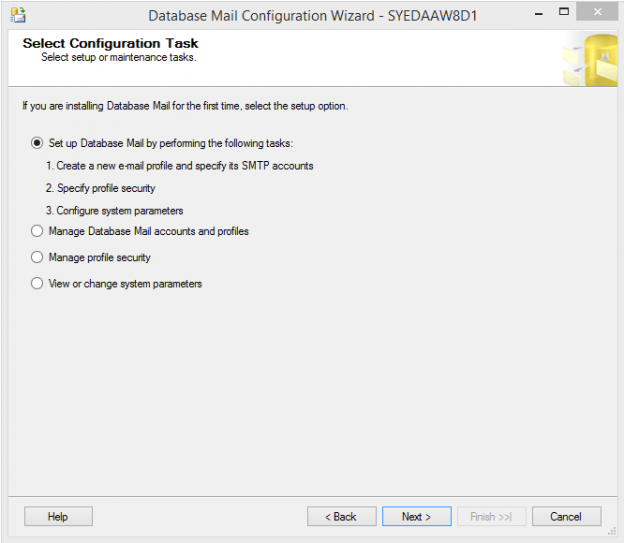
Open SSMS, Expand Management and Right-click Database Mail -> Then click “Configure Database Mail”

Set up Database Mail:

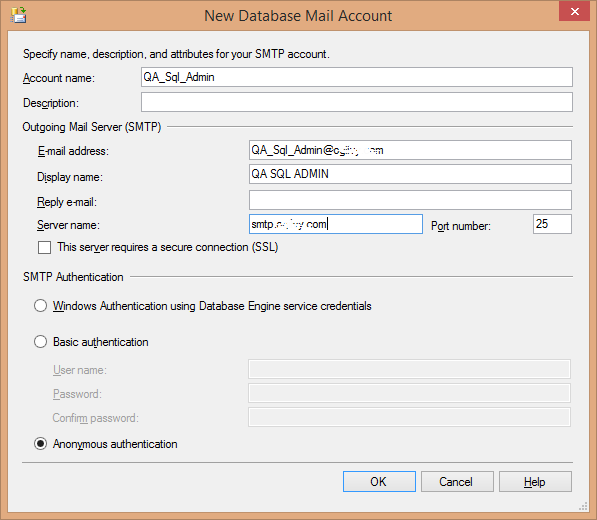
Give the profile a name and then add an SMTP account.

You can use whatever you’d like to for the account name, but you will have to get the server name and SMTP Authentication information from your systems or mail administrator.

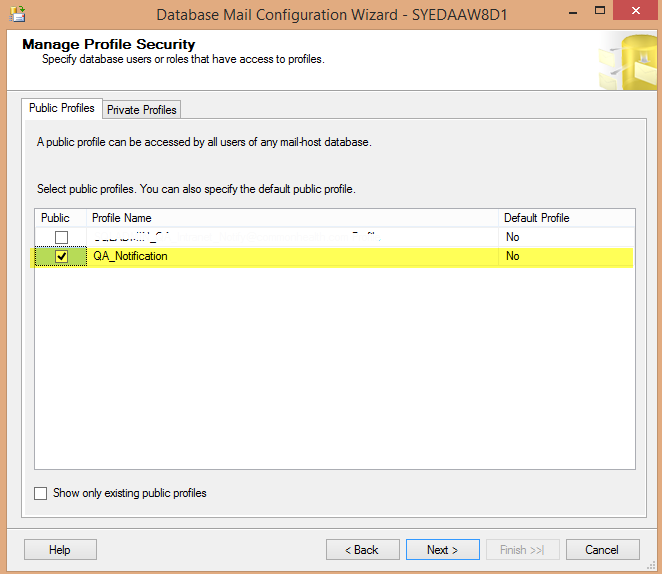
Select the right profile and press next and finish in the screens that follow:

(Feel free to reference for more detailed information on how to setup database mail).
Remember the profile name, because we’re going to use it when writing our little script.
So, just for the sake of this blog article, let’s come up with a simple script.
Let’s pretend we need a list of employees from the employee table whose current employment status is false, or 0 (if using a bit column date type).
|
1 2 3 4 |
SELECT Name, EmploymentStatus, StartDate FROM dbo.Employee WHERE EmploymentStatus = 0 |
Great, now we need to utilize the mail profile we setup to send this list to the appropriate recipients or distribution list. (Note, in an effort to make our code as clean as possible, it’s highly recommended that you have your mail administrator create a distribution list and add every one of the recipients. Not only does this make the code clean, it will be easy to add new email addresses to the list so that they can receive the reports).
Now we use the stored procedure (msdb.dbo.sp_send_dbmail) and provide the values for the following parameters. (To get more detailed information regarding this stored procedure feel free to explore this link).
|
1 2 3 4 5 6 7 8 9 10 11 12 13 14 |
begin exec msdb.dbo.sp_send_dbmail @profile_name = 'QA_Notification’, @recipients = ‘human_resources@company.com’ @subject = ‘Employment Status’, @query = ' SELECT Name, EmploymentStatus, StartDate FROM dbo.Employee WHERE EmploymentStatus = 0’, @attach_query_result_as_file = 1, @query_attachment_filename = 'EmploymentStatus.csv' End |
You can test out the code within a query window, but our goal is to have it send it automatically. Thus we can create a SQL Agent Job and schedule it to run every morning (or as per the request of the users).
But what if there are zero records to report? Do you really think the recipients want to go through the hassle of getting an email if there are zero results to the query? Well we can add one additional piece of code to remedy this. And it’s really quite simple!
|
1 2 3 |
IF (SELECT COUNT(*) FROM dbo.Employe WHERE EmploymentStatus = 0)> 0 |
Add this piece of code to the top to verify that there are rows to return. If it’s greater than zero it will go ahead and execute the rest of the script.
|
1 2 3 4 5 6 7 8 9 10 11 12 13 14 |
IF (SELECT COUNT(*) FROM dbo.Employe WHERE EmploymentStatus = 0)> 0 begin exec msdb.dbo.sp_send_dbmail @profile_name = 'QA_Notification’, @recipients = ‘human_resources@company.com’ @subject = ‘Employment Status’, @query = ' SELECT Name, EmploymentStatus, StartDate FROM dbo.Employee WHERE EmploymentStatus = 0’, @attach_query_result_as_file = 1, @query_attachment_filename = 'EmploymentStatus.csv' End |
Create a SQL Agent job, schedule it and make this piece of code a step. This method is quite versatile as you can use it for more than just sending records and reports to users. You can create custom alerts for yourself (the DBA)! Be creative, query DMV’s or whatever metrics you want, if they reach a certain threshold have the job email you.
Furthermore, you can go ahead and encompass the code into a stored procedure with parameters to make things even easier for yourself. The code would be cleaner, and a lot more flexible depending on what you want the parameters to be. You can even add in some error handling if you’d like.
As you can see, the possibilities are endless.
Before I conclude this post, I want to quickly touch on SQL Server Job Ownership. Who should “own” a SQL Agent Job and why does it matter?
When a SQL Server Agent Job executes, it will use the server’s own credentials to log into a session. Then it will switch the login of the session to the account that owns the SQL Server Agent job that is currently running. You can have a job potentially run under the incorrect security context. This can result in failures and strange entries into the SQL server log. (Well not strange to SQL server, but strange to whoever is sifting through them). Let’s say that SQL server defaulted to a regular employee username to execute a job and then that employee leaves the company. The job will start failing and the DBA has another problem to fix. This could be a disaster if that account owned many jobs that could include backups, data loads etc…As you can see, it would be quite a mess.
It is best to have a dedicated service account that is a member of the fixed sysadmin server role in SQL server take ownership of all SQL Jobs.
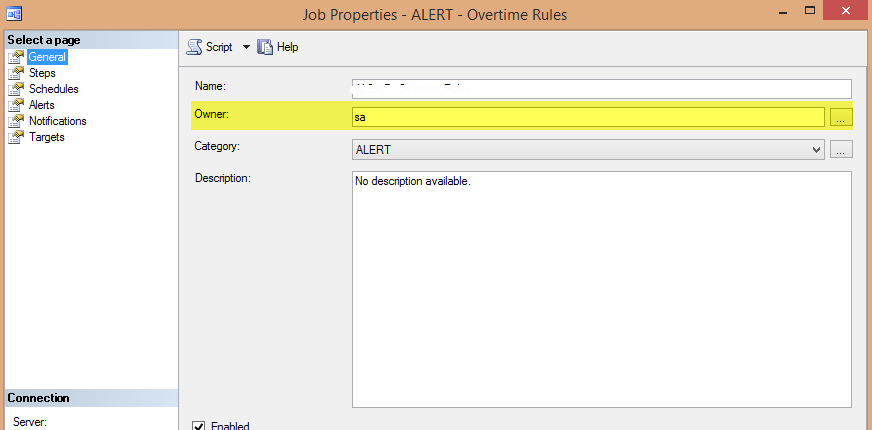
It’s a good idea to get in the habit of setting this option upon creating a new job. When in the job properties simply go to the General menu and look at “Owner”. If it’s not already set to the right account simply click the box next to the field and change it. In this example, the owner is SA (or you can use the service account for SQL Server or SQL Agent).
If you want to check who owns the all SQL jobs on your servers you can create a query that pulls data from the msdb.dbo.sysjobs and join it to the master.syslogins table. I’ve used something like this in the past:
|
1 2 3 4 5 6 7 |
select j.name AS [JobName], l.name AS [LOGIN] from [msdb].[dbo].[sysjobs] AS J join master.sys.syslogins AS l on j.owner_sid = l.sid |
And if you get creative, you can make an alert for yourself using methods from the first part of this post. See the flexibility that we have now?
For more information regarding SQL Agent account settings please feel free to go here
I hope that you found the information in this post useful and that you can take the general ideas to create customized solutions for yourself. Please feel free to share your creative solutions in the comments below or email me directly! I would like to hear from you!
References
- Configure Database Mail
- sp_send_dbmail (Transact-SQL)
- Select an Account for the SQL Server Agent Service
- Is SQL Server Always Encrypted, for sensitive data encryption, right for your environment - July 27, 2018
- Use cases for Query Store in SQL Server - July 18, 2018
- When to Use SQL Temp Tables vs. Table Variables - February 21, 2017


