This article explains the process of defining custom color codes for SQL Server connections in SSMS.
Introduction
DBAs or developers might work simultaneously with different environments such as production, UAT, staging, development. Sometimes, you might execute a query in a different environment in case you miss to check the environment. We should always be careful as accidentally query execution might put you in trouble. For example, in a development environment, we might drop a few objects without worrying much. If the same object exists in the production database as well and you accidentally run the query in production, you are in big trouble.
Specify custom colors for SSMS connection
Be careful while running any query. You can verify the connected instance using the status bar of SSMS. Each new query window provides the connection details.
In the following screenshot, we verify connected SQL instance as well as an authenticated user:

SSMS provides a solution for us to determine the environment as per the environment color coding. For example, we can set a red color for production, yellow for development, etc.
Usually, we launch SSMS, specify the SQL instance, and connect to the respective SQL Server.

Click on Options, and you get various configuration tabs in SSMS.

Let’ have a quick overview of these tabs of SSMS:
- Login: It is the default connection window of SSMS. We specify the following configurations:
- Server type: Type of the SQL Service we want to connect, such as database engine, Analysis Service, Integration services, and reporting services
- Server Name: It is the SQL instance name. For a default instance, we can specify a dot(.) or MSSQLSERVER. For a named instance, enter the SQL instance in the format of [Server\SQLInstance]. If you use a SQL port other than the default, specify that port number as well as [Server\SQLInstance:Port]
- Authentication: We can choose the authentication mechanism, either Windows or SQL authentication. For SQL authentication, specify SQL user and password details
- Always Encrypted: We use this option if using SQL Server Always Encrypted feature
- Additional Connection parameters
Connection Properties: In this connection properties, We can use the following optional configurations

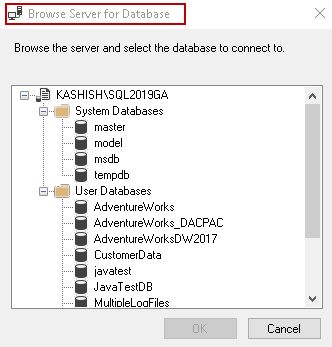
Connect to database: If we want to connect to a specific database, we can use this option, browse the server and select the required database. If we do not specify any database, the user gets a connection to the default database specified in the SQL logins

- Network protocol and network packet sizes: Here, we can choose the network protocol and packet size. You should change this property only on specific requirements
- Connection time out and execution time out: We can configure the connection and execution time outs value in seconds in these values
- Encrypt connection: if we use encrypted SQL connections, we can put a tick on this. Your SQL instance should be configured for the encrypted connection before using this option
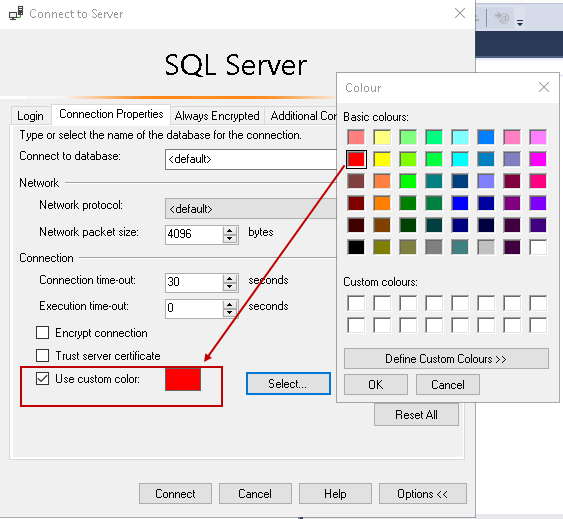
- Use Custom color: Usually, we do not use this option much, but it can prevent us from accidental query execution in the wrong SQL instance
Put a check on Use custom color and select a color from the available colors:

Now, connect the database instance and view the query pane. Notice the difference. You get a custom color code for the status bar. This way, you can easily visualize that this connection belongs to a production SQL instance. Similarly, you can configure color codes for other databases while connecting using SSMS:

Local Server groups and custom status bar color
In the previous step, we specified the custom status bar color while connecting it using SSMS. Usually, DBAs register the supported SQL instances using the local server groups. We can create multiple server groups in various groups such as application group, environment group depending upon an individual’s requirements.
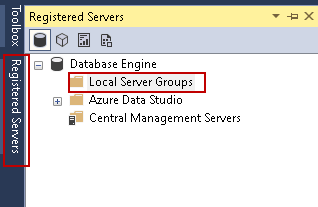
We can click on the Local Server Groups from the registered servers, as shown below:

Right-click on the Local Server Groups and click on the New Server Group. Specify the group name (mandatory) and group description (optional):

Similarly, create another group Staging:

We have two local server groups, as shown below:

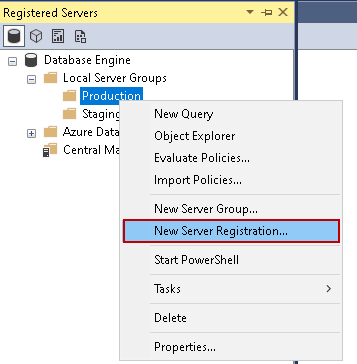
We can register the servers in the individual group. To register a server, right-click on the group name and click New Server Registration:

It opens the SSMS connection window. We can define the SQL Server connection along with server color coding. Save the connection, and it reflects in the corresponding server group:

In the following screenshot, we see both production and staging local server group contains server registered. We have defined different color codes for the ribbon bar while saving the connection. The benefit of using a local server group is that it is a one-time activity. Once we have defined connection properties, we can easily connect to that instance group without any additional configurations:

Now, connect to servers from both production and staging local server groups. Open a new query window in both connections and notice the different color codes for both instances:

Important points
- We can customize color codes for the database engine connections. We cannot use it for Analysis Services, Reporting Services, and Integration
- Ribbon bar color codes is a local SSMS feature. If you use different SSMS, you will get default color codes
- You should use different colors for a separate environment to avoid any confusion
Conclusion
You might have heard a famous saying – “Prevention Is Better Than Cure”. It applies to databases as well. You should always check the connections before executing a query. You can also use this article reference for customizing the ribbon bar color codes as per the environment in SSMS.
See more
To boost SQL coding productivity, check out these SSMS add-ins including T-SQL formatting, refactoring, auto-complete, text and data search, snippets and auto-replacements, SQL code and object comparison, multi-db script comparison, object decryption and more

- Understanding PostgreSQL SUBSTRING function - September 21, 2024
- How to install PostgreSQL on Ubuntu - July 13, 2023
- How to use the CROSSTAB function in PostgreSQL - February 17, 2023


