This article will provide information about requirements and step-by-step instructions on how to set up automated image based database provisioning including configuring the host environment to fulfilling basic requirements.
To begin, here is the list of items that would be required on premise:
- Hyper-V PowerShell module to allow virtual disk creation, detection and mounting functionality
- PSDatabaseClone PowerShell module with accompanying dependent modules PSFramework and dbatools
- Dedicated local folder with share enabled to assign network path for the folder where database images will be created and stored
- Local folder to store database clones
Installing the Hyper-V PowerShell module
Installation of the Windows Hyper-V PowerShell module is very straightforward. Open the Windows Control Panel and from the listed items open Programs and Features item. Select Turn Windows features on or off option and from the Windows Features window check the Hyper-V module for Windows PowerShell item and confirm with OK.
Installing the PSDatabaseClone PowerShell module
The PSDatabaseClone utility is available in Microsoft PowerShell gallery and it can be installed directly from it.
To start the installation, open the PowerShell console with administrative privileges and use the following command:
|
1 |
Install-Module PSDatabaseClone |
Depending on local PowerShell configuration, after the command execution, it is possible to receive a message that PowerShell gallery was not set as trusted installation repository. To proceed with installation, confirm with “Y” end press enter.
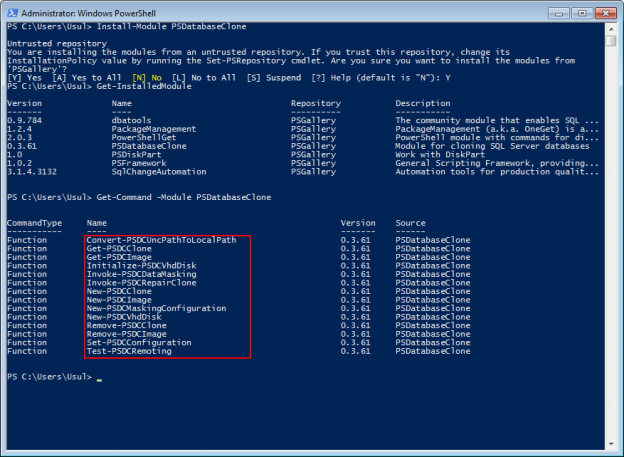
Along with the PSDatabaseClone module, a couple of dependent modules will be automatically installed so the utility could work properly. The modules in question are PSFramework and dbatools. To verify the installation, use the command:
|
1 |
Get-InstalledModule |
The console should list all required modules with their version numbers and descriptions:
Also, the list of available PSDatabaseClone cmdlets can be obtained with the command:
|
1 |
Get-Command -Module PSDatabaseClone |
After installation, PSDatabaseClone will require some additional configuration. This utility will require an information repository where information about database images, image hosts, and database clones are going to be stored.
To start configuration, use the following command:
|
1 |
Set-PSDCConfiguration |
The execution of this command will prompt to choose the type of repository that will be used for collected data about images.

This can be a dedicated database or a set of JSON files. Choose preferred option but note that it is not recommended for the data to be stored in JSON files as they could be prone to accidental corruption (for example removing, renaming or deleting the parenting folder).
Setting up the JSON configuration
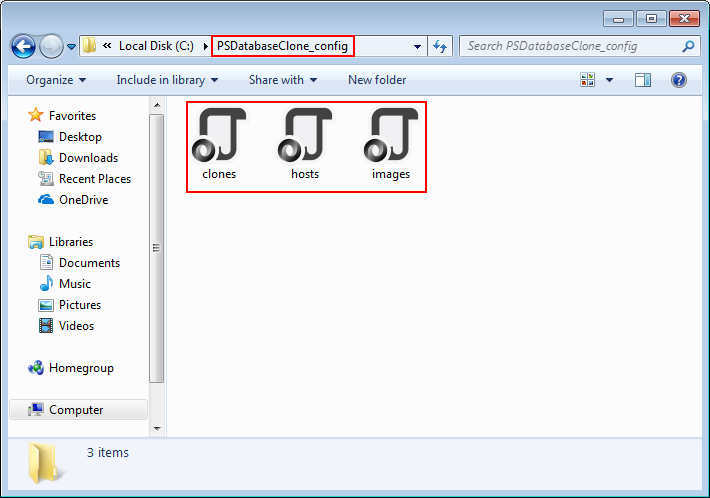
Choose the JSON type data by entering “J” in the prompted line. Next prompt will ask for location for JSON files. Enter full path to the folder where JSON files will be stored and make sure that this is an existing folder.

With path confirmation the prompt will ask for login credentials. These will be required in case location folder requires authorized access for the user in the current Windows session (e.g. network share). Enter credentials or omit them if not needed and PowerShell will prompt messages about successful configuration.

It is expected that JSON configuration files will appear at the designated location.
Setting up the database configuration
Choose the database type data by typing “D” in the prompted line or just confirm with “Enter” as it is default choice. The setup will prompt for SQL Server name, this will be the name of the SQL Server instance where database containing collected image data will be attached on.

After the SQL Server name, the prompt will ask for the database name. Confirm with “Enter” to accept offered default name “PSDatabaseClone” or type in another name that will help easily identify the designated database.

With the database name set the SQL Server connection credentials can be entered. Naturally, if Windows authentication method is used these credentials can be omitted, otherwise provide proper username and password for SQL Authentication method. Again, after these steps PowerShell will prompt messages about successful configuration.

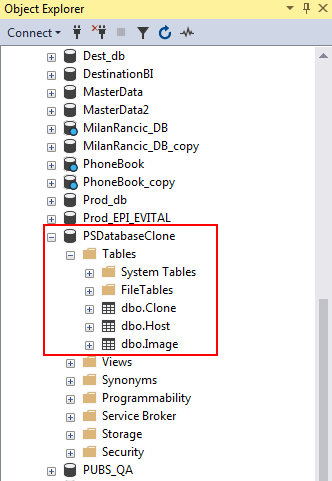
Verification that the PSDatabaseClone repo database is created can be simply done with SSMS where it should be listed in Object Explorer with its given name.
Setting the output folders
PSDatabaseClone and inherently ApexSQL DevOps toolkit Provision step will require designated locations for database images and clones.
Location for database images will have to be a local shared folder as Provision step is designed to work with UNC paths to store created database images and it is valid assumption that database provisioning will be performed across a network infrastructure so images will have to be available through network share.
The screenshot below shows the example for standard local folder that was provided with network path using simple file sharing:
When share of the designated folder is set and active it is necessary to set certain access permissions. The reason for that is the fact that SQL Server would have to write data in that folder and therefore will have to have writing permissions which does not have by default.
To set proper permission open the Properties window from the folder right-click context menu, open the Security tab and then click Edit.
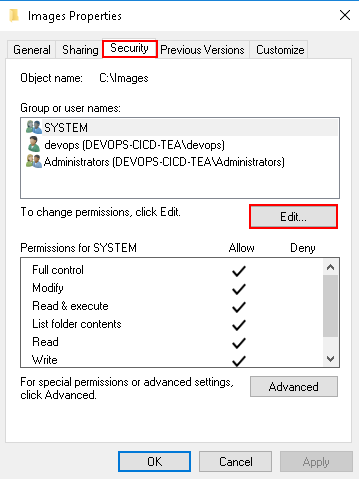
The window for editing permissions for security objects will open from where the Add… button should be clicked to add new object and set permissions for it.
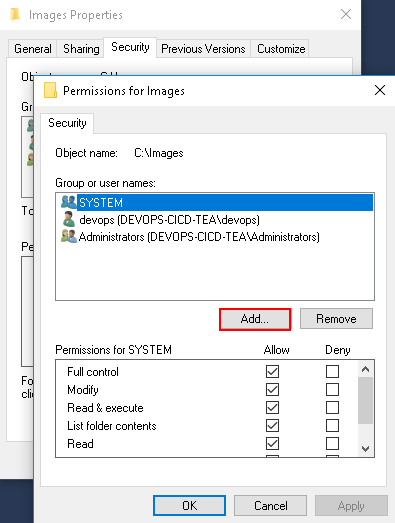
What is required now is to add a security principal that will allow writing to SQL Server. One option is to add “Authenticated Users” security principal which represents a scope of sessions authenticated by some account, like SQL Server active service session.
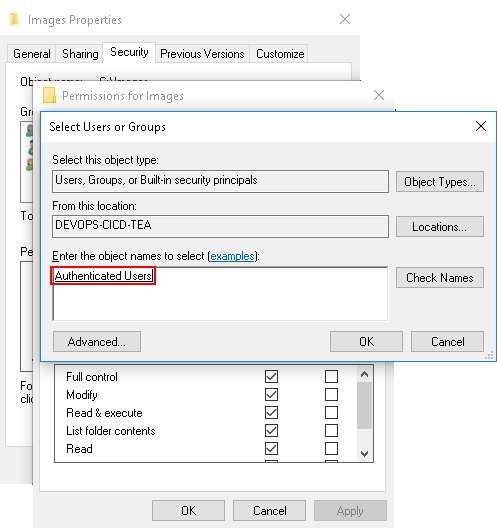
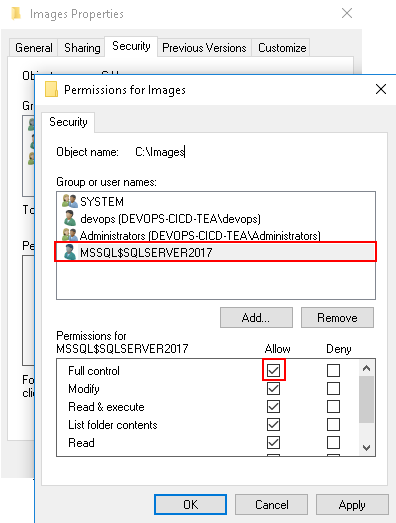
If there is a need to limit access to the sherd folder, it would be enough just to add the same login account that was used for starting the SQL Server service.
Confirm the addition of new security object and make sure that it was granted full control of the shared folder.
The final element for Provision step configuration is a location where database clones will be stored. This is a folder where virtual disks that hosts database clone will be created and from there attached to target SQL Server. There is no special requirement for this folder, this is simply one chosen local dedicated folder with an easily recognizable name.
- PowerShell encrypt password techniques for SQL Server - April 18, 2019
- How to setup image based SQL Server database provisioning with PSDatabaseClone - March 22, 2019
- SQL database provisioning via Database clone using PSDatabaseClone PowerShell module - February 4, 2019

