This article explains the process of installing the AdventureWorks2016 and AdventureWorksDW2016 sample database on a stand-alone instance of SQL Server and Azure SQL Server. The sample databases were published by Microsoft to demonstrate how to design a database using SQL Server. Microsoft has also published another lightweight database named AdventureworksLT, which can be used as a sample database on Azure SQL Server.
Installing sample databases on stand-alone SQL instance
To install AdventureWorks2016 and AdventureWorksDW2016 databases, you must install SQL Server Express/Standard/Enterprise Edition and SQL Server Management Studio.
On the stand-alone SQL instance, both databases can be installed by the following methods:
- Direct download and restore the full backup of the database
- Download the install scripts from GitHub and build the database by executing the script
Install Adventureworks2016 using the full backup
First, let us install the database using the backup file. You can download the AdventureWorks sample database from the following links:
- AdventureWorks2017.bak
- AdventureWorks2016.bak
- AdventureWorks2014.bak
- AdventureWorks2012.bak
- AdventureWorks2008R2.bak
Once the backup is downloaded, open SQL Server Management Studio and from Object Explorer, expand database engine, right-click on Databases and select Restore Database. See the following image:

In the Restore Database window, select Device as a source and click on ellipse (…):

In the Locate backup devices window, select the backup media by clicking Add, and then in the newly opened window navigate to the directory where the database backup is downloaded and select the backup (.bak) file. Click OK:

If you want to change the physical location of the data file and log file, click on Files pane and change the target location for the data and log files. Note that it is best practice to keep data files and log files on separate drives:
Click OK. It will initiate the database restoring process. Once the database restores successfully, a popup appears stating that the database has been restored successfully. See the following image:
Now, our database has been restored, and we can connect it using the SQL Server Management Studio. See the following image:

Similarly, you can download the AdventureWorksDW2016 from the links below and install it by restoring the database on SQL Server stand-alone instance.
You can download the AdventureWorks data warehouse database from the following links:
- AdventureWorksDW2017.bak
- AdventureWorksDW2016.bak
- AdventureWorksDW2014.bak
- AdventureWorksDW2012.bak
- AdventureWorksDW2008R2.bak
Build a database by executing the installation scripts
We can also prepare the database by executing the database installation script on SQL Server. To do that, first, you must download the installation scripts of AdventureWorks2016 and AdventureWorksDW2016 databases. You can download the installation scripts of the AdventureWorks OLTP database from AdventureWorks-OLTP-install-script.zip or use the files in the OLTP-install-script GitHub folder.
Once files are downloaded, extract those files using WinRar or any other data compression tool. After extracting the files, execute the following steps:
- Enable the SQL Server full-text search feature
- Copy the installation script and other files to “C:\AWorks2016Database\” directory
- Open the “instawdb.sql” file in SQL Server Management Studio
-
Change the value of the environment variable SqlSamplesSourceDataPath to “C:\AWorks2016Database\“
:setvar SqlSamplesSourceDataPath “C:\AWorks2016Database\”
-
Change the value of the environment variable DatabaseName to “AdventureWorks2016_InstallScript“
:setvar DatabaseName “AdventureWorks2016_InstallScript
-
To execute the scripts, we must enable the SQLCMD mode in SSMS. To do that, click on Query menu and select SQLCMD Mode. See the following image:

-
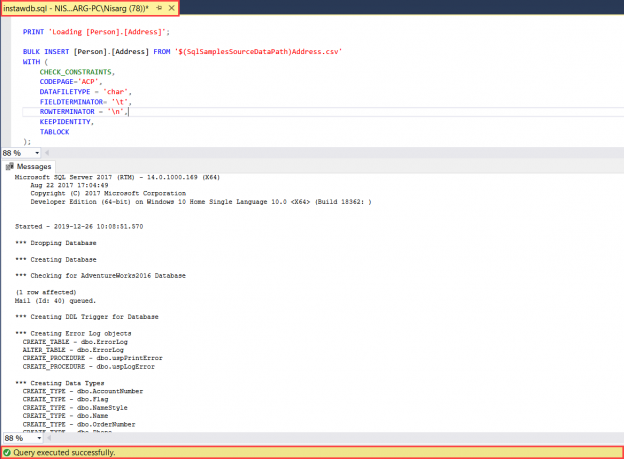
Click on Execute or Press F5 to run the script
The script will create all the database objects and add them to the tables
Once the script is executed successfully, you can see the AdventureWorks2016_InstallScript database in Object Explorer of SQL Server Management Studio. See the following image:

Similarly, to install AdventureWorksDW2016, you must download the installation scripts. You can download the installation script of the AdventureWorks OLAP database from AdventureWorksDW-data-warehouse-install-script.zip or use the files in data-warehouse-install-script Github folder. To install the AdventureWorksDW2016 database, follow the same process, which I explained above.
Installing sample databases on Azure SQL Server
To install the sample database on Azure SQL Server, you must create a SQL Server resource group with the AdventureWorksLT database. To do that, log in to the Microsoft Azure portal, and on the home screen, click on Create a resource. See the following image:
On the next screen, click on SQL Database. See the following image:

On the next screen, fill the details of subscription, resource group, name of the database, and name of the server and type of compute + storage. Click Next. See the following image:

In the Additional settings menu, choose Sample from the Use existing data option under the Data source section. Click Review + create. See the following image:

In the Review + create step, verify the configuration, and click on Create:

SQL Database Deployment process will start. It will take a couple of minutes. Once the deployment process completes, you will be able to connect to the database from the SQL Server Management Studio. See the following image:

Summary
In this article, I have explained how we can install the AdventureWorks2016 sample database on SQL Server stand-alone instance using full backup and installation scripts. Moreover, I have also installed the AdventureWorksLT database on Azure SQL Server.
- Different ways to identify and change compatibility levels in SQL Server - July 22, 2024
- Copy SQL Databases between Windows 10 and CentOS using SQL Server data tools - October 19, 2022
- Changing the location of FILESTREAM data files in SQL Database - October 14, 2022


