This article explores the RESTORE FILELISTONLY command in SQL Server with examples.
Introduction
Performing a database backup is an integral part of a DBA’s job. Backups are taken to ensure that data can be recovered in an emergency. There are different restore mechanisms, and the SQL Server DBA needs to understand them to make the right decision in each situation.
Depending on the situation and type of backup available, restoring the database will either be possible or not. For example, if we want to take a backup of the prod database for testing purposes, we would need a Copy-Only of the backup. However, if the database becomes corrupt or the server fails, we might be unable to restore it.
The MSDB system database stores the backup information. We can examine these system tables to find the backup type (full, differential, t-log), status, start, end, end time, and size. Similarly, the SQL Server error log specifies messages related to backup success or failures. In case of failure, you can view the error number and message to troubleshoot it.
For a better understanding, let’s first understand a few basic terms for SQL Server backup.
- Backup Set: It is the contents of a successful backup
- Backup Device: The disk, tape, or cloud destination (Azure blob storage or Amazon S3 bucket) to which SQL Server performs database backup
- Media set: The backup media set with one or more backup devices
- Log sequence number (LSN): The SQL Server internal number system identifies transaction log operations
- Primary data file (MDF): It is the main data file of a SQL Server database. Each SQL Server database default has one primary data file with the extension MDF
- Transaction log file (LDF): Each database has one transaction log file with the extension LDF. It allows “point in time” restores for any system failures
Suppose you do not have access, or you do not know the source SQL Server instance of database backup. Similarly, you do not know whether the backed-up database contains multiple data and log files. This information is necessary for planning a database restore, especially an extensive database, so you can prepare for database file placement across multiple drives.
Let’s explore a few helpful SQL Restore statements that allow you to view backup metadata without restoring the backup file.
Note: For this article, I use the [AdventureWorks2019] sample database that you can download from the Microsoft repository.
SQL Server RESTORE FILELISTONLY
The Restore FileListOnly command returns the list of data and log files in the SQL Server backup dataset.
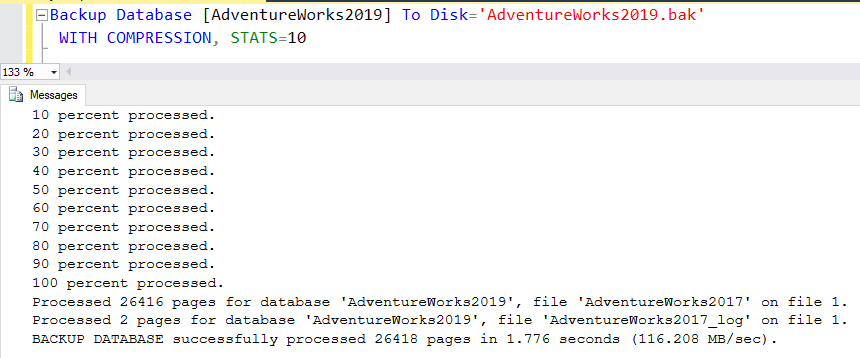
Let’s connect to our lab SQL Server instance and take a full database backup using the following T-SQL script.
Suppose you get the backup file [AdventureWorks2019.bak], and you do not know how many data or log files the source database contains. Put the backup file in a directory in which the SQL Server service account has access and run the following query.
|
1 2 3 4 |
RESTORE FILELISTONLY FROM DISK = 'AdventureWorks2019.BAK' GO |
It returns the following information.
- LogicalName: It returns the logical data and log file name.
- Physical Name: It is the physical name of the file. The Physical name contains the full path of source DB files. SQL Server default uses the same path for restoring the DB files. If you are not ok with the existing path, we can modify the file location using WITH MOVE clause in the Restore Database statement.
-
Type: The type column helps determine which file is a data or a log file.
- Value D: Data file
- Value L: SQL Server log file
- Value F: Full-Text Catalog
- Value S: FileStream, FileTable, or In-Memory OLTP container
- FileGroupName: It returns the filegroup name for the data file. SQL Server default uses a PRIMARY filegroup for the primary data file. Its value is NULL for the Transaction log file as it does not belong to a filegroup.
- Size: It is the current file size in bytes.
- MaxSize: It is the maximum allowed size in bytes
- CreateLSN: it reflects the Log sequence number at which the file was created.
- DropLSN: If the file was dropped, it reflects the LSN at which it was dropped. Else, its value is NULL.
- ReadOnlyLSN: The ReadOnlyLSN is the log sequence number at which filegroup status was changed from read-write to read-only.
- ReadWriteLSN: The ReadWriteLSN is the log sequence number at which filegroup status was changed from read-only to read-write.
- BackupSizeInBytes: The size of the file’s backup in bytes.
- SourceBlockSize: The SourceBlockSize reflects the block size of the physical device in bytes.
- DifferentialBaseLSN: This column is vital if you want to restore differential backups. It contains the changes for the log sequence number greater than or equal to DifferentialBaseLSN.
- TDEThumbprint: If you use transparent data encryption (TDE) for encrypting backup files, this column contains the thumbprint of a database encryption key. The thumbprint is a SHA1 certificate hash with whom the key is encrypted.
- SnapshotURL: SQL Server 2016 onwards, we can take database backup directly into Azure blob storage. Therefore, this column contains the URL for the Azure snapshot of the database file contained in the FILE_SNAPSHOT backup. Its value is NULL if the backup file does not belong to Azure blob storage.
As the screenshot shows, my [AdventureWorks2019] database contains one data and log file.
We can verify it by running the sp_helpfile command in the source database.
|
1 2 3 4 5 |
Use AdventureWorks2019 Go Exec sp_helpfile |
Let’s add a secondary data file using the ALTER DATABASE statement below.
|
1 2 3 4 5 6 7 8 9 |
USE [master] GO ALTER DATABASE [AdventureWorks2019] ADD FILE ( NAME = N'DemoAdventureWorks', FILENAME = N'C:\Program Files\Microsoft SQL Server\MSSQL16.MSSQLSERVER\MSSQL\DATA\DemoAdventureWorks.ndf' , SIZE = 8192KB , FILEGROWTH = 65536KB ) TO FILEGROUP [PRIMARY] GO |
After adding the file, verify that it is added successfully. The output below shows an additional data file [DemoAdventureWorks] in the [AdventureWorks2019] database.
Initiate another full backup and check the number of database files using the RESTORE FILELISTONLY command. As shown below, the backup set contains three files similar to the source database.
How to Use RESTORE FILELISTONLY output to move database files to a new drive while restoring
Suppose you need to restore a database file on a test SQL Server instance. You checked the source database files directory using the RESTORE FILELISTONLY statement.
Source database files directory: C:\Program Files\Microsoft SQL Server\MSSQL16.MSSQLSERVER\MSSQL\DATA
You want to put database files in a folder C:\testdbrestore\. You want to generate a t-SQL script for restore database statement that uses the RESTORE FILELISTONLY output and uses WITH MOVE clause for moving all database files into a new directory during restore. How would you do that?
Let’s run the following query that supplies the following inputs:
- @backuplocation: Specify your backup file path with the backup file name. for this example, I specified the path ‘C:\Program Files\Microsoft SQL Server\MSSQL16.MSSQLSERVER\MSSQL\Backup\AdventureWorks2019.bak’
- @filelocation: It is the path where we want to put database files during restoration. Please make sure the destination directory exists before running the script.
- @dbname: It is the destination database name.
|
1 2 3 4 5 6 7 8 9 10 11 12 13 14 15 16 17 18 19 20 21 22 23 24 25 26 27 28 29 30 31 32 33 34 35 36 37 38 39 40 41 42 43 44 45 46 47 48 49 50 |
SET NOCOUNT ON Declare @backuplocation nvarchar(500) Declare @filelocation varchar(255) Declare @dbname varchar(100) Declare @sql nvarchar(max) set @backuplocation = 'C:\Program Files\Microsoft SQL Server\MSSQL16.MSSQLSERVER\MSSQL\Backup\AdventureWorks2019.bak' --Replace with backup file location set @filelocation = 'C:\testdbrestore\' -- Replace with destination data folder location set @dbname = 'NewRestoreDb' -- Replace with destination database name Create table #RestoreFileListOnlyOutput( LogicalName NVARCHAR(128), PhysicalName NVARCHAR(260), Type CHAR(1), FileGroupName NVARCHAR(128), Size numeric(20,0), MaxSize numeric(20,0), Field bigint, CreateLSN numeric(25,0), DropLSN numeric(25,0), UniqueId uniqueidentifier, ReadonlyLSN numeric(25,0), ReadWriteLSN numeric(25,0), BackupSizeInBytes BigInt, SourceBlockSize Int, FileGroupId int, LogGroupGUID uniqueidentifier, DifferentialBaseLSN numeric(25,0), DifferentialBaseGUID uniqueidentifier, IsReadOnly bit, IsPresent bit, TDEThumprint varbinary(32), SnapshotURL nvarchar(360) ) insert into #RestoreFileListOnlyOutput EXEC('RESTORE FILELISTONLY FROM DISK = '''+@backuplocation+'''') -- Build the T-SQL RESTORE statement set @sql = 'RESTORE DATABASE ' + @dbname + ' FROM DISK = ''' + @backuplocation + ''' WITH STATS = 10, ' select @sql = @sql + char(13) + ' MOVE ''' + LogicalName + ''' TO ''' + @filelocation + LogicalName + '.' + RIGHT(PhysicalName,CHARINDEX('\',PhysicalName)) + ''',' from #RestoreFileListOnlyOutput where IsPresent = 1 set @sql = SUBSTRING(@sql,1,LEN(@sql)-1) Print @sql |
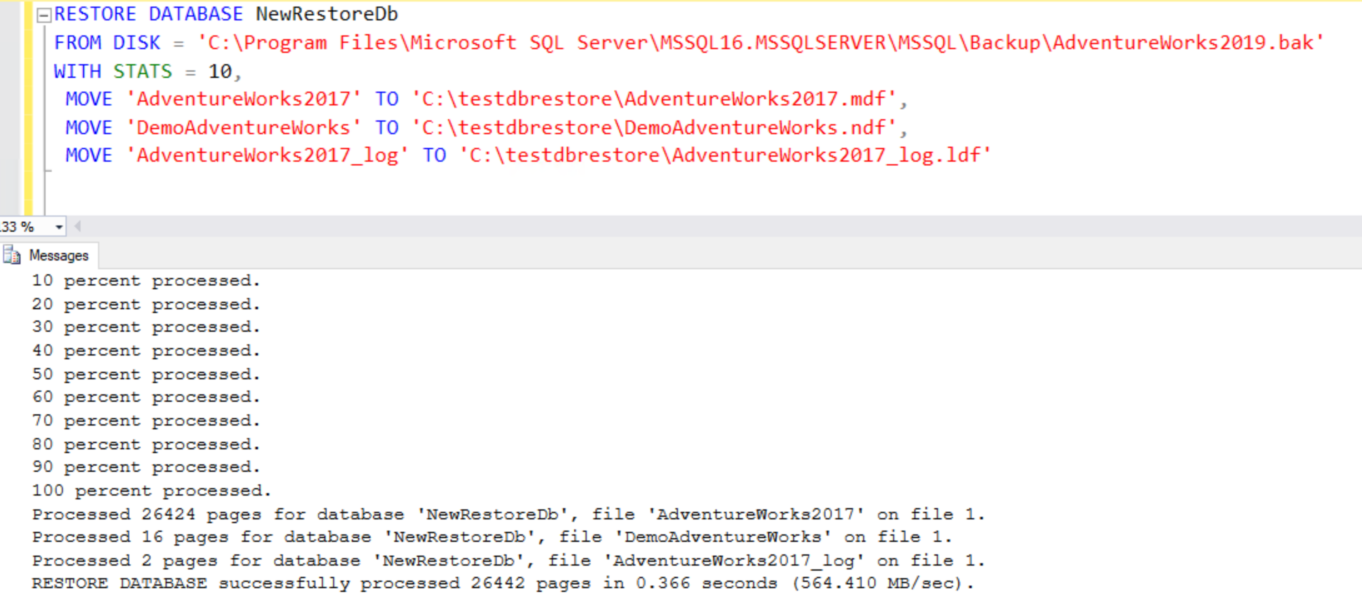
Once you execute the query above, it prints the t-SQL script you can validate and execute manually to restore the database with a custom file destination. For my example, here is the output query:
|
1 2 3 4 5 6 7 8 |
RESTORE DATABASE NewRestoreDb FROM DISK = 'C:\Program Files\Microsoft SQL Server\MSSQL16.MSSQLSERVER\MSSQL\Backup\AdventureWorks2019.bak' WITH STATS = 10, MOVE 'AdventureWorks2017' TO 'C:\testdbrestore\AdventureWorks2017.mdf', MOVE 'DemoAdventureWorks' TO 'C:\testdbrestore\DemoAdventureWorks.ndf', MOVE 'AdventureWorks2017_log' TO 'C:\testdbrestore\AdventureWorks2017_log.ldf' |
Copy the script in a new query window of SSMS and execute it. The query uses WITH MOVE clause and moves all files into C:\testdbrestore\ directory. The script worked fine and restored the database in our specified directory.
 To verify the destination database files directory, run the sp_helpfile command and verify the physical path.
Conclusion
This article explored the RESTORE FILELISTONLY statement to check the source database files logical, physical name, and a few other properties that you can check before planning a database restore. You can use the query specified above to restore a database in a new directory quickly.
- Understanding PostgreSQL SUBSTRING function - September 21, 2024
- How to install PostgreSQL on Ubuntu - July 13, 2023
- How to use the CROSSTAB function in PostgreSQL - February 17, 2023


